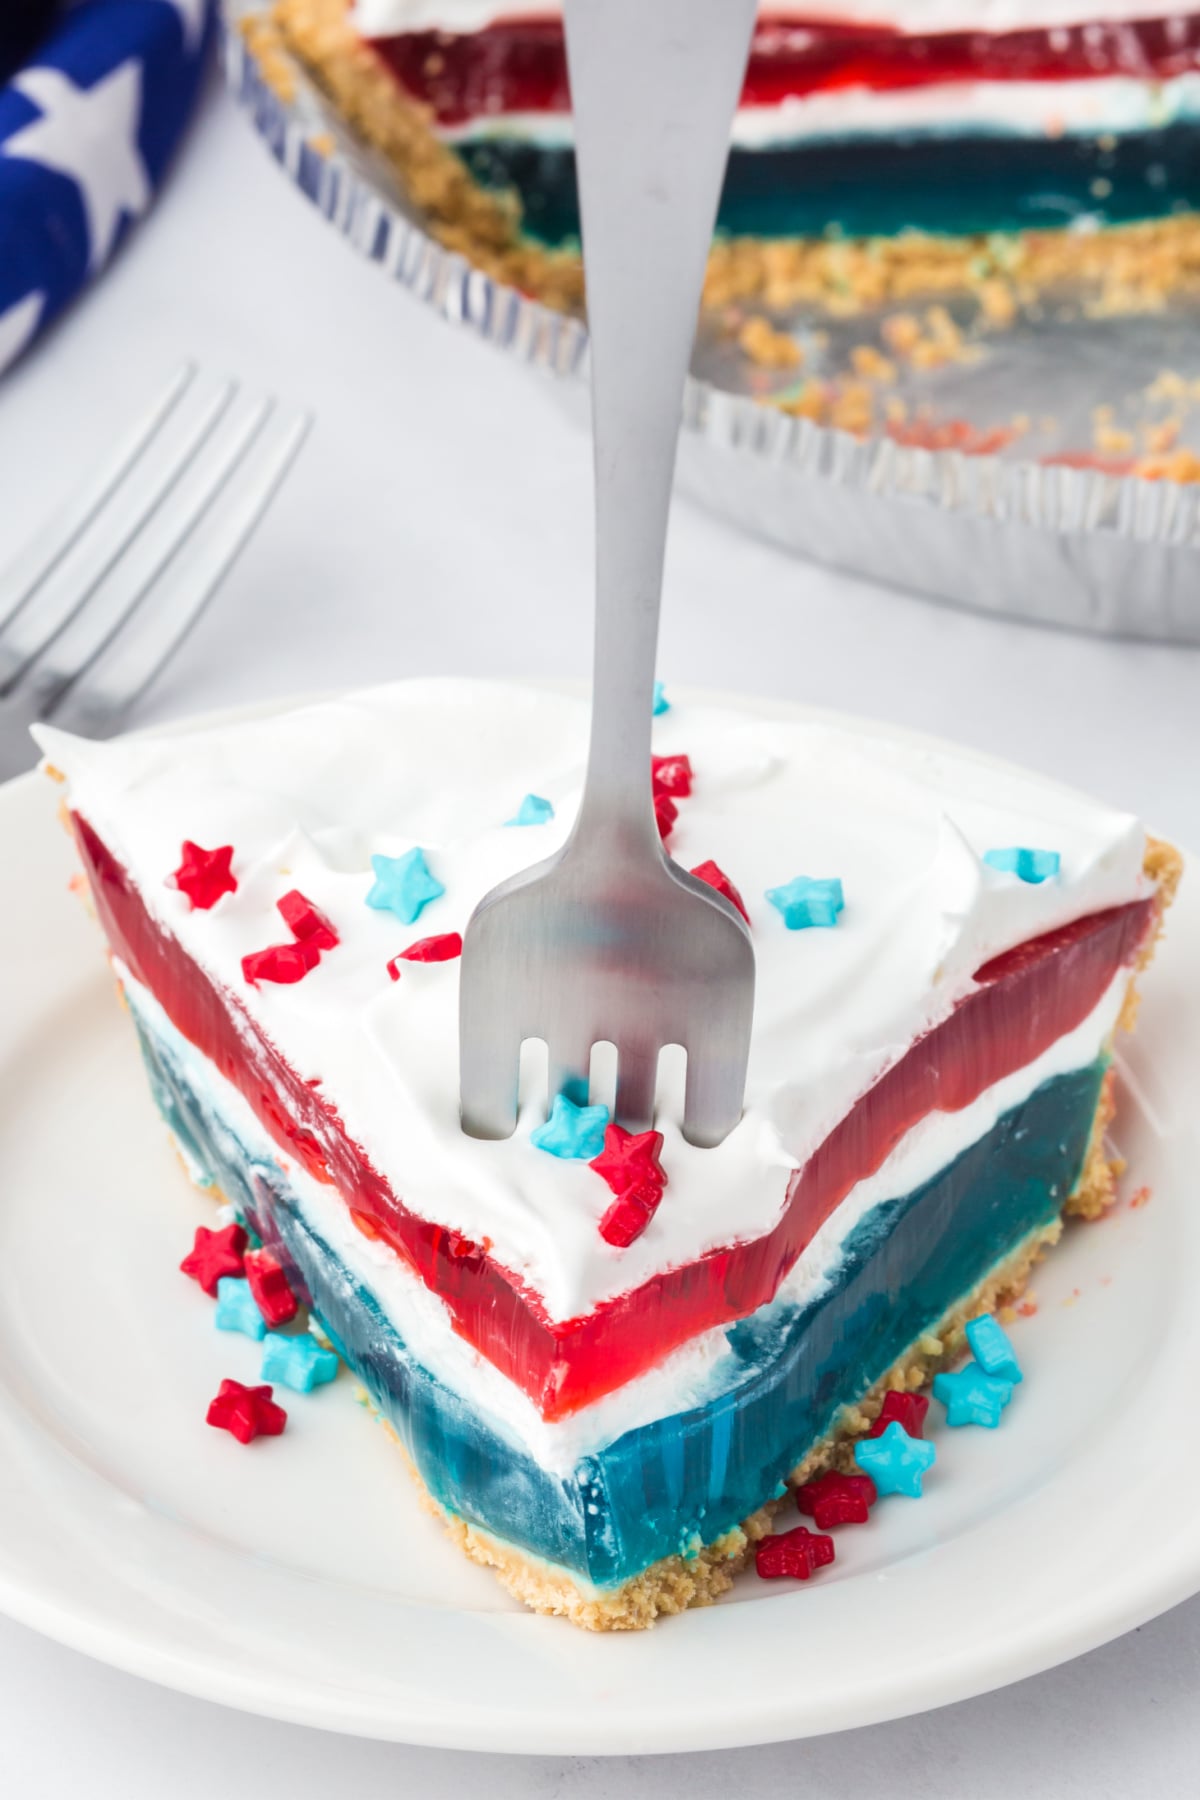
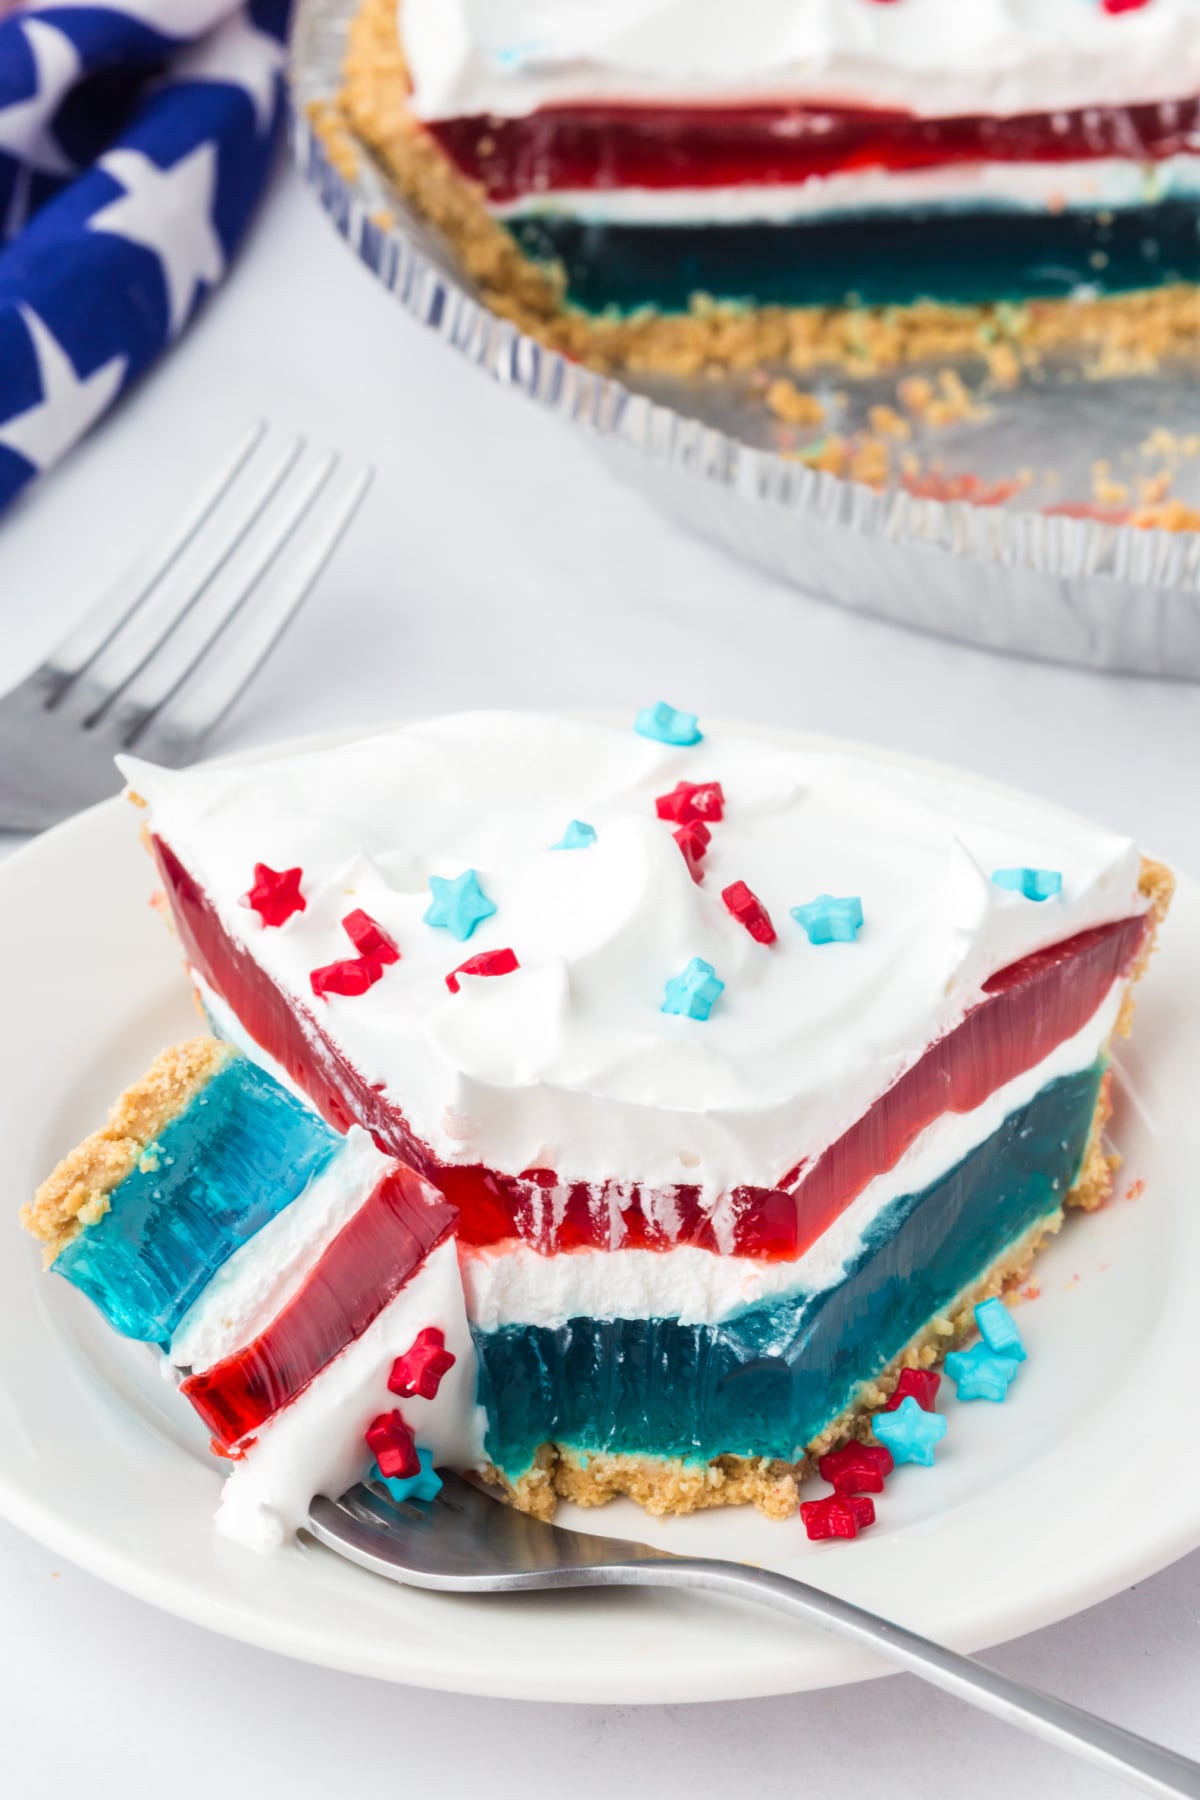
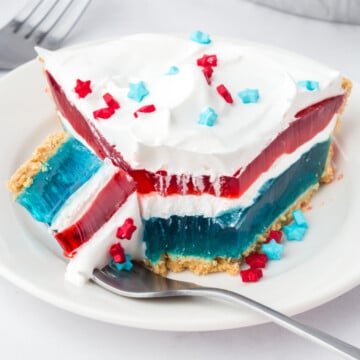
This 4th of July Jello Pie is all about those clean red, white, and blue layers, and allowing each to set fully. Rushing the chill time causes the colors to mix rather than form beautiful slices. Make it ahead so it's ready for your party, and keep it well chilled during the summer heat.
4th of July Jello Pie Recipe Essentials
- 🍽️ Course: Dessert
- ⏱️ Cooking Time: No baking; about 2 hours 30 minutes total, including chilling time
- 🍴 Servings: 8 Servings
- 🍰 Flavor Profile: Sweet, fruity, and creamy with layered red and blue jello and light whipped topping like our jello pretzel dessert
- 🍓 Best Served With: Fresh berries or extra whipped topping on the side
- 🧊 Make Ahead?: Yes, must be chilled and can be stored in the fridge for up to 7 days or frozen (best served frozen)
Summarize and Save This Content On
The first time I made this Fourth of July pie, I tried a homemade crust, but it cracked and absorbed the Jello color. After that, I switched to a store-bought crust that holds together and saves time. The layers come from my "chunky Jello technique," letting each layer partially set so the colors stay separate.
Now it's a favorite July 4th make-ahead dessert that looks impressive but takes only about 20 minutes of hands-on work. Our red, white and blue berry dessert is also make-ahead and absolutly delicious. Some more Jello dessert recipes you should try are my Jello poke cake and Jello Cool Whip pie.
Why This Recipe Works
- There's no oven required: This is a completely no-bake dessert, making it ideal for summer. Who wants a hot kitchen in the middle of July?
- It's a crowd-pleasing dessert: If you're looking for an easy dessert to take to a party or potluck that looks impressive but takes minimal effort to make, this one is perfect. So are my Jello parfaits.
- The chunky Jello trick helps the presentation: I discovered the trick to getting clean and pretty layers where the colors won't bleed. Now you can use it to make your own perfect Jello pie!
- You only need 6 ingredients to make it: I only use 6 simple ingredients to make this showstopping dessert. It's uncomplicated and inexpensive.
Ingredients
Everything you need to make this patriotic Jello pie is listed below, minus any decorations like sprinkles.
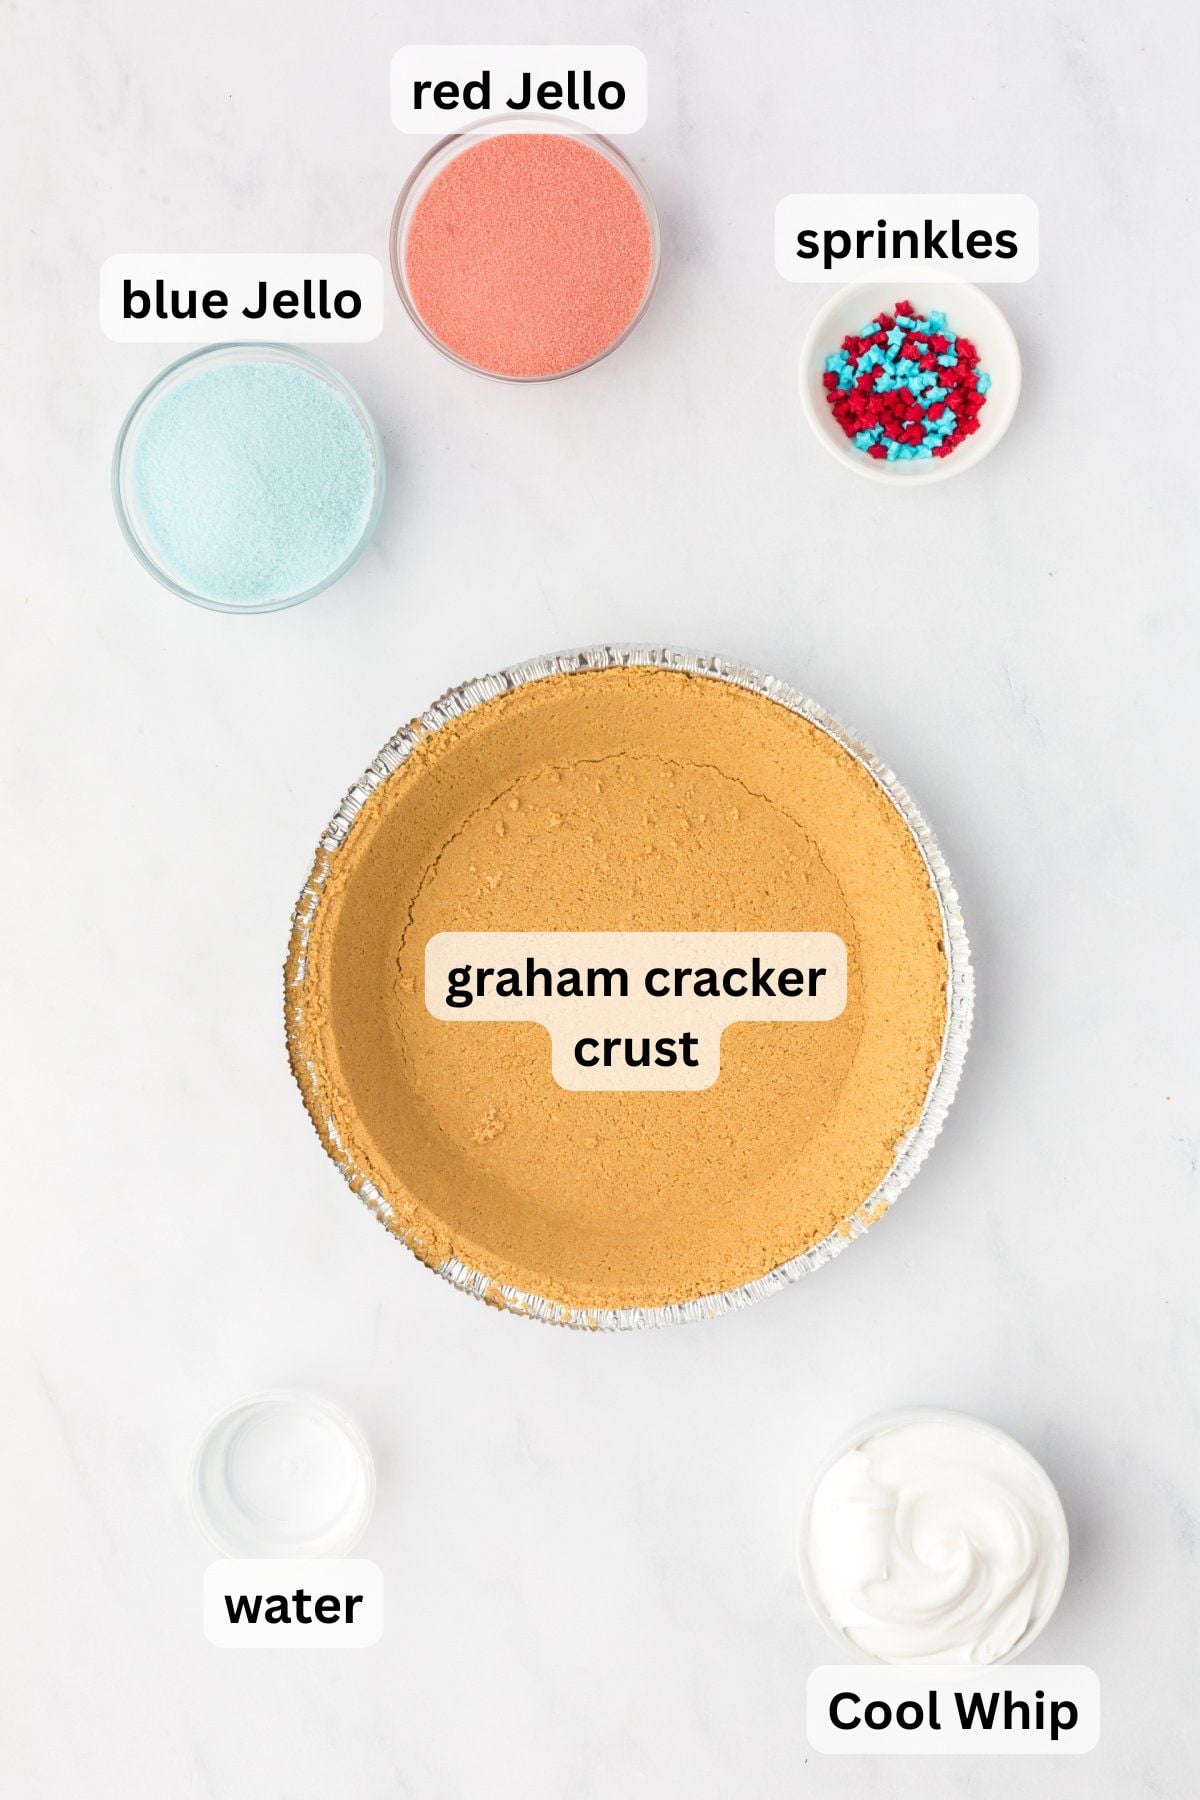
- Graham cracker crust: I use a store-bought graham cracker crust as a shortcut to save time and to ensure the structure of the red, white, and blue Jello pie.
- Jello mix: For the layers, you'll need blue Jello and red Jello mix. Any flavors will work here, so pick what you like. Blue raspberry or blueberry is a great choice for blue, while cherry and strawberry are classic for the red layer.
- Water: You'll need both boiling and cold water to dissolve and set the Jello. I use different ratios than what the packages call for, and this is what helps the Jello set into clean layers without bleeding color.
- Cool Whip: Ensure it's fully thawed before you use it. Frozen Cool Whip will not spread easily and smoothly over the top of the pie. This will be the white layer for your patriotic dessert.
See the recipe card below for exact ingredient amounts, nutritional information, and detailed instructions.
Variations
- Mini patriotic Jello pies: Turn this into a mini version with personal graham cracker crusts, similar to these red, white, and blue Jello cups.
- Add a fresh fruit topping: Finish your 4th of July pie with fresh fruit like strawberries, raspberries, and blueberries. The colors match the theme and texture, too.
- Swap the Jello flavors: If you typically use cherry, try strawberry! As long as they are red and blue, swap the Jello mixes with whatever you want.
- Serve it frozen: One of my favorite ways to enjoy this dessert is straight from the freezer. If you freeze it, don't thaw it! It's so delicious that way.
How to Make a 4th of July Jello Pie
To get started, I like to gather the ingredients and boil the water so it's ready to go to create the first layer of the pie.
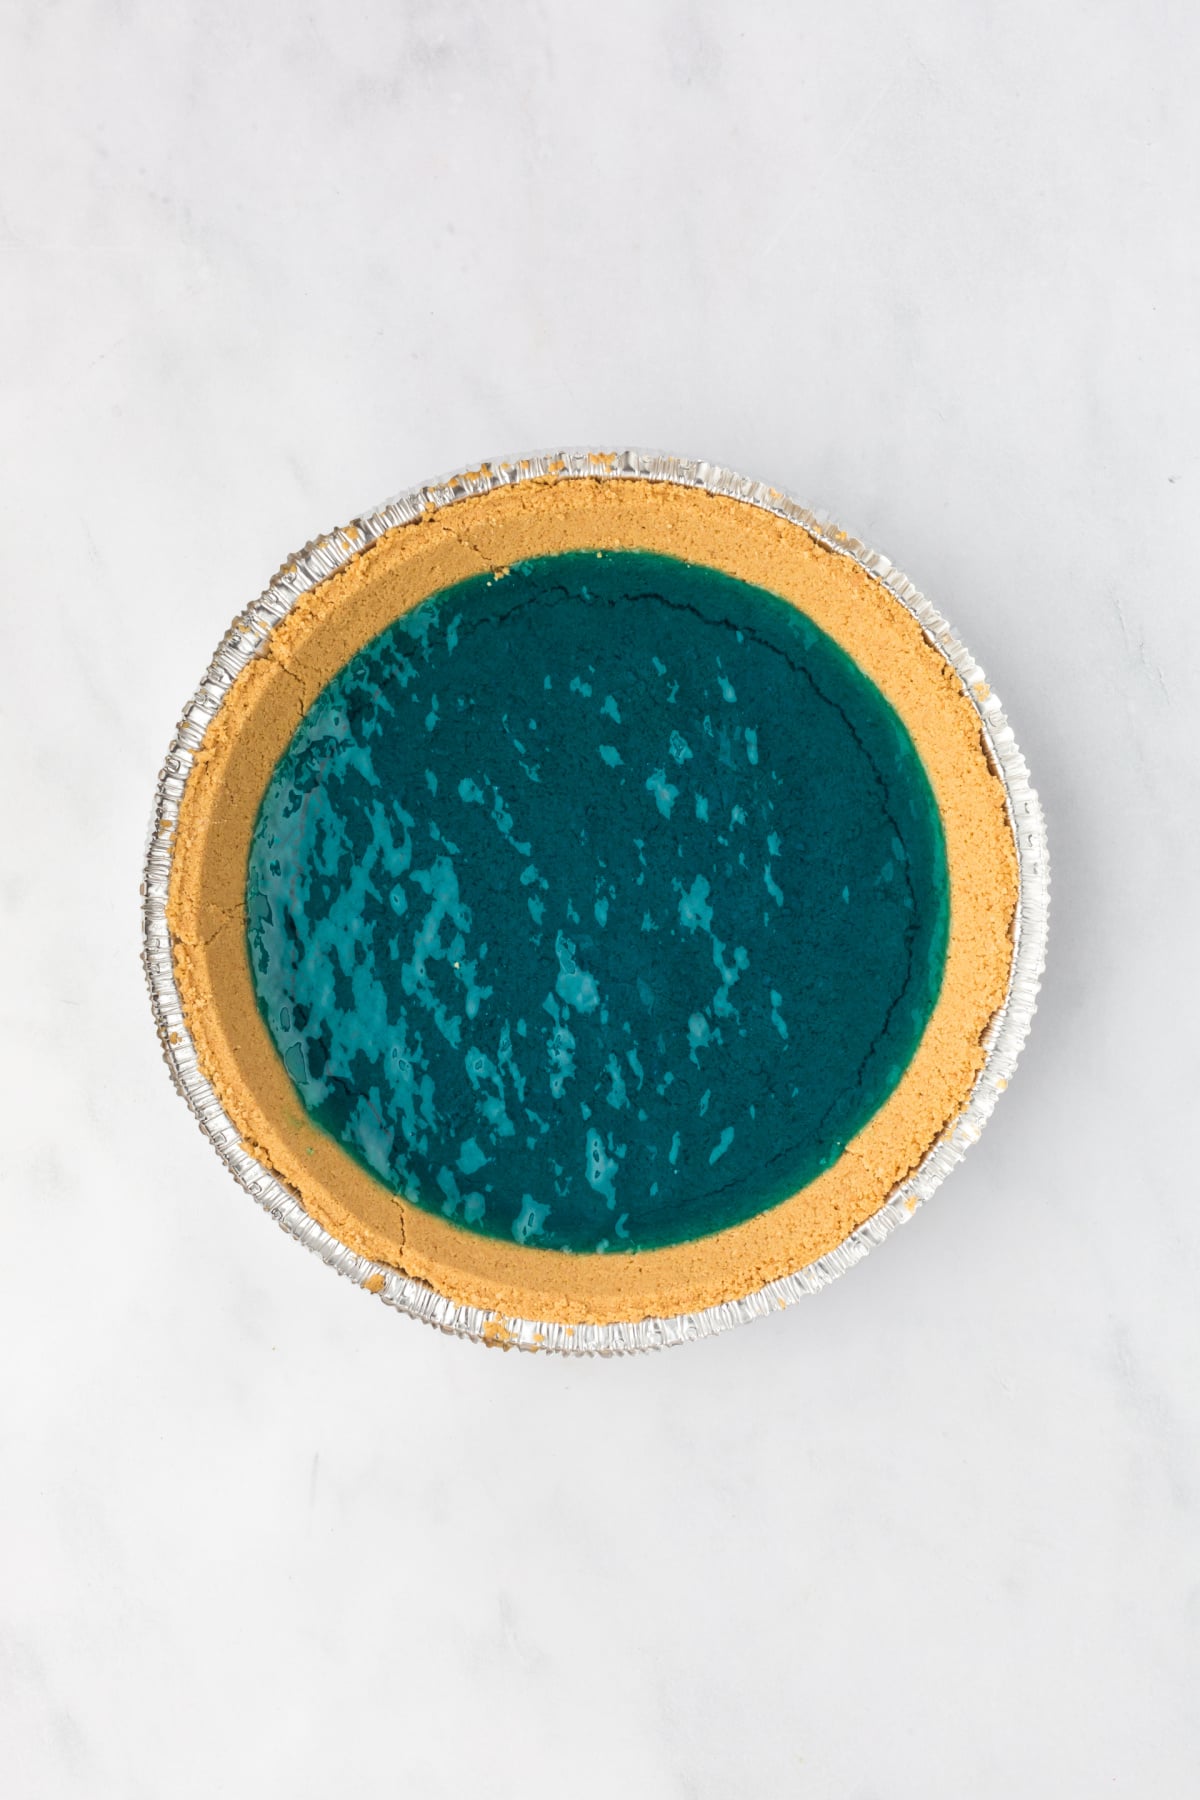
Step 1: Make the blue Jello layer. Start by dissolving the blue Jello in boiling water, then stir in ice-cold water. Then, chill it for about 30 minutes until it's partially set - you want a chunky, wobbly gel, not firm. Now you can pour the chunky Jello directly into the crust for a bright, distinct blue layer, then chill it for 1 hour to firm up.

Step 2: Add half the Cool Whip. Spread a layer of Cool Whip edge-to-edge to fully cover the crust, keeping the red layer from bleeding into the blue. Then, chill it for a few minutes.
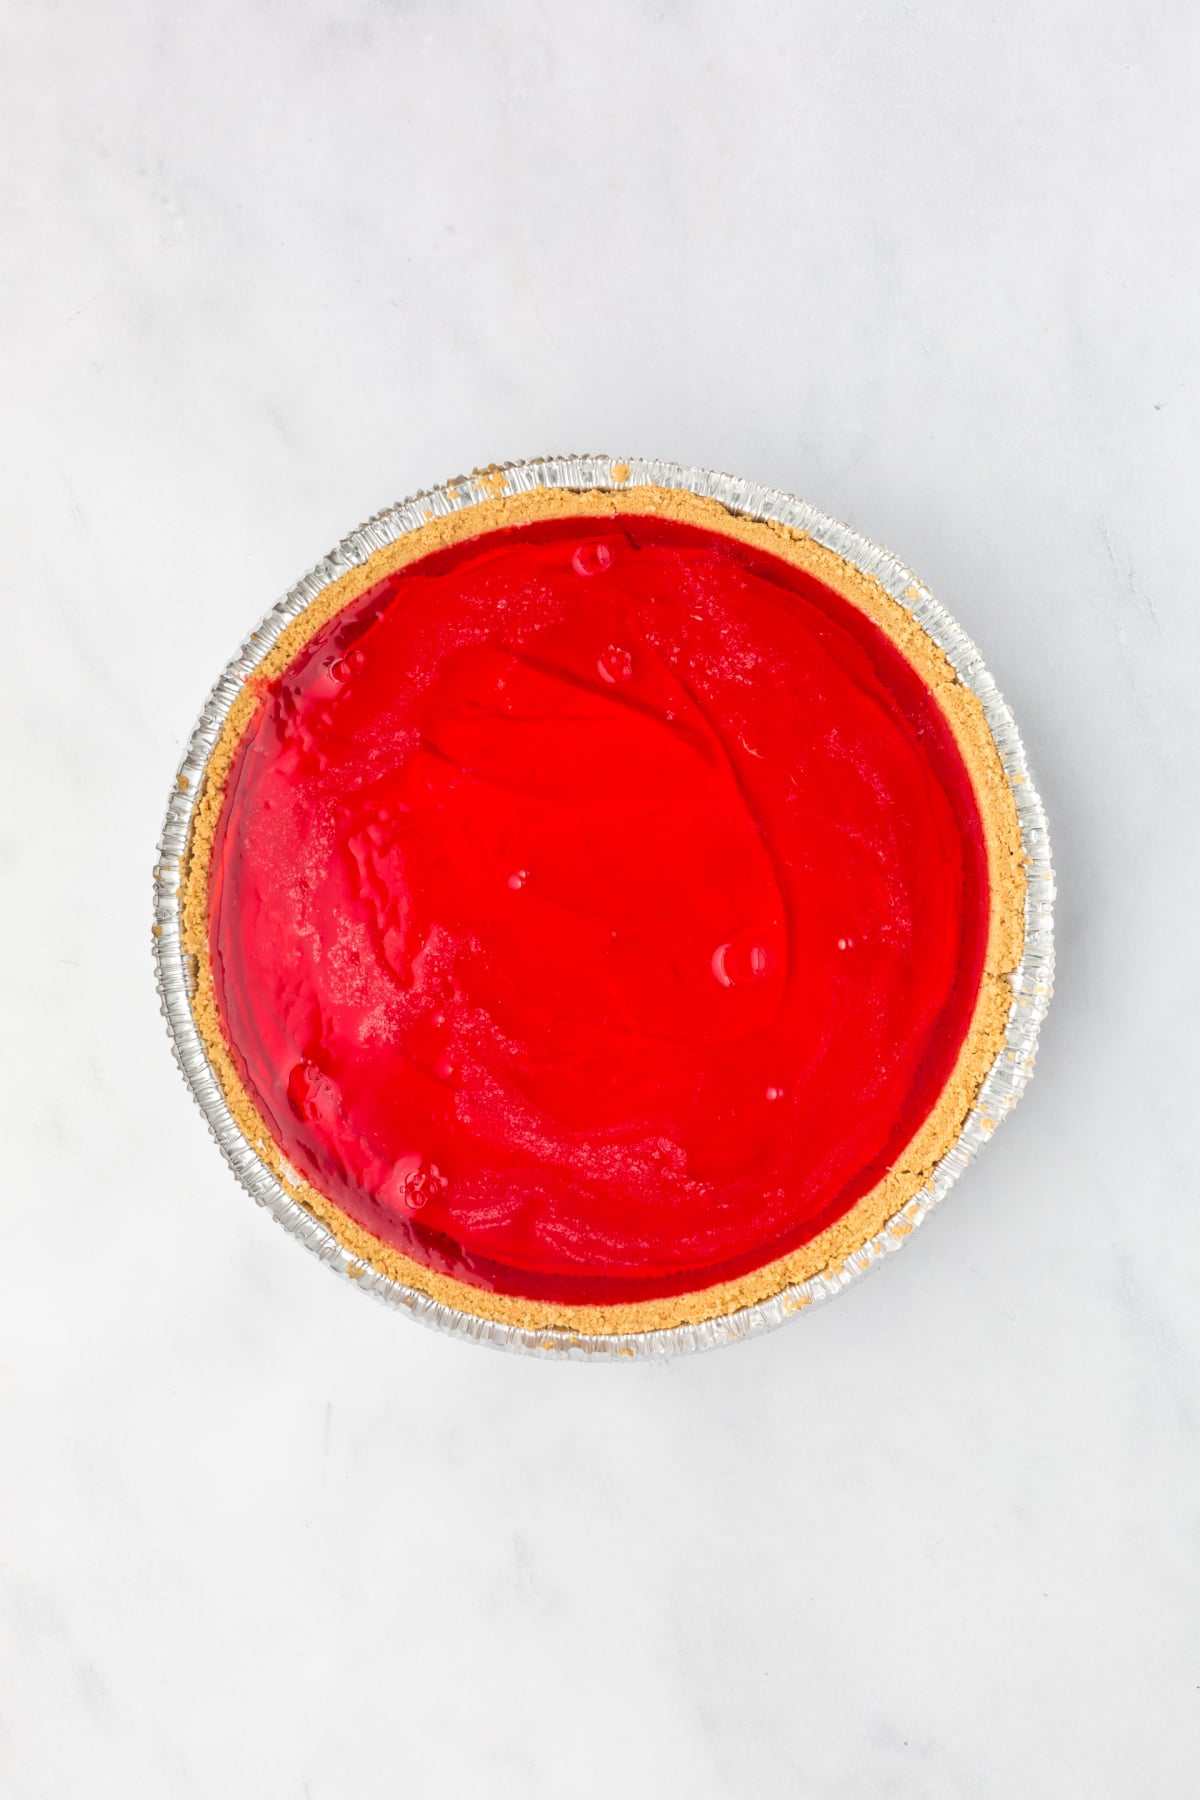
Step 3: Prepare the red Jello. Follow the steps from the blue layer: dissolve, chill partially, then pour chunky. Then, pour it slowly from the center outward while the pie stays in the fridge, so you don't end up carrying liquid Jello around.

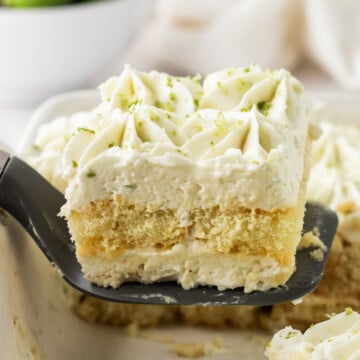
Step 4: Add the remaining Cool Whip and sprinkles. When it's firm, spread the remaining Cool Whip over the top and add sprinkles. Slice with a clean, sharp knife to reveal the colorful layers and enjoy a piece with a bomb pop cocktail.
Expert Tips
- Pour the Jello when it's ready: It's important to allow the Jello to partially set before you pour it into the pie crust. This comes back to the "chunky technique" because allowing the Jello to start setting keeps it from bleeding color into other parts of the pie.
- Don't rush the chilling process: Chill each layer for the minimum amount of time written in this recipe. If you skip or rush a step, you don't get clean, separate layers. Patience is the key to success!
- Add sprinkles right before serving: I like to add the sprinkles right before I serve this Jello pie to guests. If you add them too soon, they can bleed color, especially in the refrigerator.
- Storage directions: Keep it in an airtight container in the refrigerator for up to 7 days. You may freeze it, but it tends to turn soupy as it thaws. Serve it straight from the freezer!
If you enjoy distinct layers like with this layered Jello pie, you'll love this red, white, and blue cheesecake.

Serving Suggestions
- Summer cookout pairings: Enjoy a delicious summer BBQ spread to celebrate July 4th! Try recipes like hot dog burnt ends or your favorite macaroni salad.
- More holiday treats: Some other sweet treats to beat the heat include strawberry banana ice cream served in these patriotic chocolate waffle cones.
- Refreshing drinks: Try this spicy jalapeno margarita if you're looking for some tasty adult cocktails. Lemonade and sweet tea are fantastic summer drinks, too.
4th of July Jello Pie Recipe FAQs
This typically happens if the next layer is poured before the first one is fully set. Since they're still liquid, the colors can bleed into one another, making a mess. Allow each layer the recommended time to chill before adding more Jello. It also helps if the Cool Whip reaches the edges of the crust, so it acts as a proper barrier between each color.
You can, but it needs to hold up to the filling. I have tried this recipe with a homemade graham cracker crust, and it cracked. I found better success with a store-bought version.
Blue raspberry and strawberry are my favorites for their bright, vibrant colors. Blueberry and cherry are deeper colors, but I enjoy those flavors together. It all comes down to what you prefer!
This is an 8-inch Jello pie that serves about 6-8 people. If you're serving a large crowd, I recommend making 2 pies so everyone gets a slice.


4th of July Jello Pie
Ingredients
- 8 Inch prepared graham cracker crust
- 3 ounce blue Jello
- 4 cups Cool Whip thawed
- 3 ounce red Jello
- 4 cups water 2 boiling, 2 ice cold
- 2 tablespoons red and blue sprinkles
Instructions
- Prepare the blue layer. In a medium bowl, add 1 cup of boiling water to the blue jello powder. Stir until all granules are dissolved. Then add 1 cup of ice-cold water. Give it a stir and place it in your refrigerator for about 30 minutes or until the jello is thickened but not formed and chunky when stirred. Pour this chunky blue jello to the prepared pie crust. Place it in the refrigerator for 1 hour or until firm.
- Prepare the white layer. Remove the pie from the refrigerator and spread a ½ inch layer of Cool Whip over the blue layer, gently making sure not to break the blue layer. Make sure to spread it all the way to the edge of the crust so your red layer and blue layer do not mix. Place it in the refrigerator.
- Prepare the red layer. In a medium bowl, add 1 cup of boiling water to the red jello powder. Stir until all granules are dissolved. Then add 1 cup of ice-cold water. Give it a stir and place it in your refrigerator for about 30 minutes or until the jello is thickened but not formed and chunky when stirred. Pour this chunky red jello over the white layer. I suggest adding this layer while the pie is still in the refrigerator so you are not carrying it with red jello spilling. Place it in the refrigerator for 1 hour or until firm.
- Add the topping. Once the whole pie is firm, spread the remaining Cool Whip over the top of the whole pie and top with sprinkles.
- Serve and enjoy!
Notes
- If your layers mix and the colors bleed, the previous layer likely wasn't fully set yet. Let each layer chill for the recommended time before adding the next. Also, make sure the Cool Whip reaches all the way to the crust edges so it forms a barrier between the colors.
- Don't pour the Jello in while it's fully liquid. Let it partially set first-the "chunky Jello" stage helps keep the colors from bleeding into the rest of the pie.


Leave a Reply