
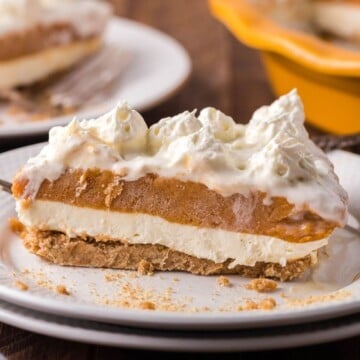
This No-Bake Pumpkin Cheesecake layers a spiced graham cracker crust with fluffy cream cheese filling, creamy pumpkin pudding, and a cloud of whipped topping for a fall dessert full of flavor and texture. No oven, eggs, or gelatin needed! Just chill it for 2 hours, or make it a day ahead to get a head start on your Thanksgiving desserts.

No-Bake Pumpkin Cheesecake at a Glance
- 🥧 Flavor & Texture: Sweet, creamy, and fluffy with warm pumpkin spice flavors and a buttery, slightly crunchy graham cracker crust.
- 🛒 Main Ingredients: Cream cheese, pumpkin puree, graham crackers, instant vanilla pudding, pumpkin pie spice, and whipped topping.
- ⏱️ Total Time: About 3 hours, including prep and chilling time.
- 🥗 Dietary Info: Vegetarian, egg-free, and gelatin-free; contains dairy and gluten.
- ☕ Best Served With: Pumpkin spice lattes, apple cider, or your favorite fall cookies.
- 🧊 Make Ahead?: Yes, prepare 1-2 days ahead, refrigerate for up to 3 days, or freeze for up to 2 months.
- ❤️ Why You Will Love It: This easy, no-bake cheesecake features four delicious layers, cozy fall flavors, and a make-ahead convenience that's perfect for Thanksgiving.
Summarize and Save This Content On
Thanksgiving is one of those days when every inch of oven space counts, so I love having a dessert like this ready and waiting in the fridge.
I can make this layered pumpkin cheesecake a day ahead and focus on the turkey and sides, and readers tell me how easy it is to put together, how much they love the pretty layers, and that there aren't any leftovers!
And since canned pumpkin is available all year, there's no need to save this recipe just for the holidays. These pumpkin cream cheese blondies and pumpkin spice muffins are some of my favorite homemade pumpkin treats.
⭐️⭐️⭐️⭐️⭐️ Reader Review
"Absolutely perfect for holiday dinner. Everybody loved it. No leftovers. Grandkids wanted seconds. I should have made 2! I will next time. Thank you for the recipe."
-Lana
Jump to:
Why This Recipe Works
- Instant pudding thickens the pumpkin layer: It helps the filling set without needing eggs or gelatin.
- Folded whipped topping lightens the cream cheese: It creates a fluffy layer that still holds its shape when sliced.
- It goes in the fridge only: Since this pumpkin cheesecake is no-bake, there is no oven needed, and you can make it ahead and let it chill until dessert.
- Pumpkin spice in the crust and filling: It adds warm fall flavor to both layers, so every bite tastes like pumpkin spice.
Ingredients
These key ingredients plus a couple of pantry staples are all you need to make this no-bake pumpkin cheesecake.
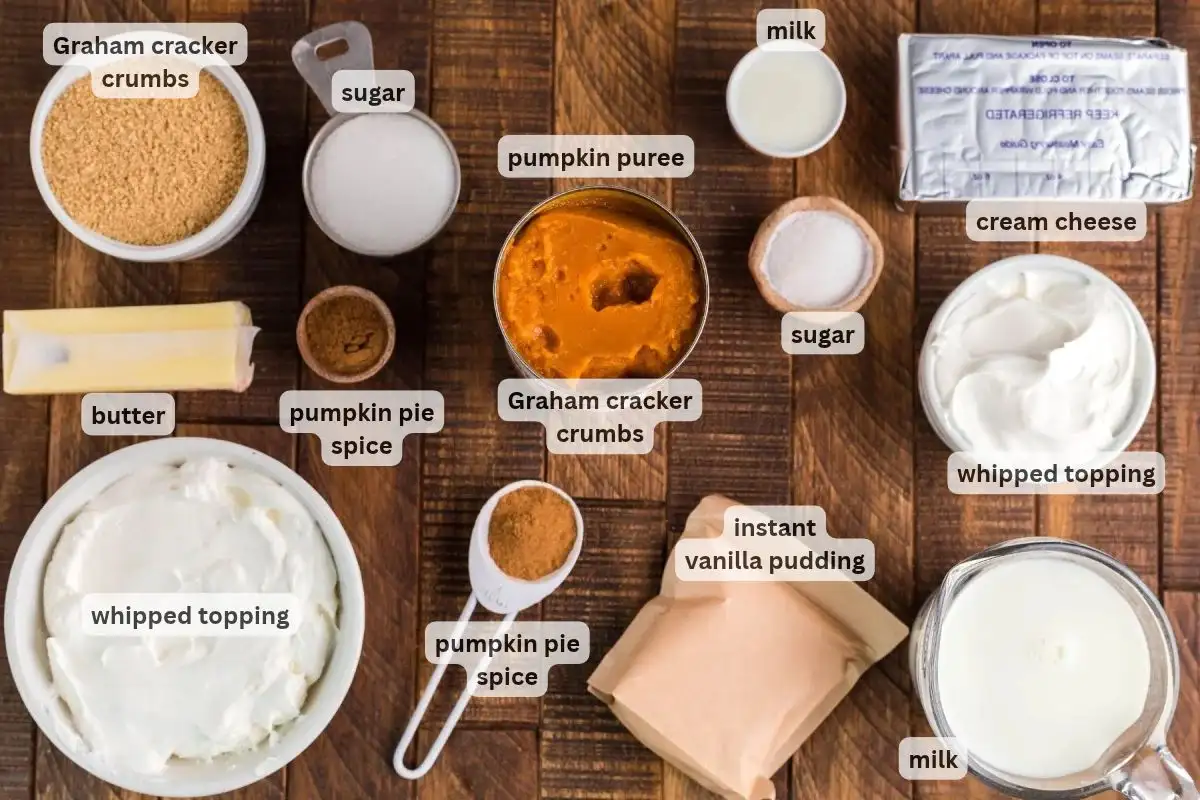
- Graham crackers: I use original honey graham crackers for the crust, but cinnamon graham crackers work, too. Any brand is fine. Crush them into fine crumbs using a food processor or a Ziploc bag and a rolling pin.
- Cream cheese: Soften it before mixing to keep the cheesecake layer smooth and lump-free. I prefer full-fat cream cheese for its richness, but reduced-fat works, too.
- Pudding mix: Use instant vanilla pudding mix, not cook-and-serve. It adds sweetness and vanilla flavor while thickening the pumpkin layer. Cheesecake-flavored instant pudding is another tasty option. Instant pudding mix is one of the main ingredients in my Oreo delight recipe, too.
- Pumpkin puree: Use pure pumpkin puree, not pumpkin pie filling, which already contains sweeteners and spices.
- Pumpkin pie spice: This adds warm spice to the crust and filling. If you don't have any, mix cinnamon, ginger, nutmeg, and either allspice or cloves.
- Whipped topping: Thaw frozen whipped topping in the refrigerator before using it. This makes it easier to fold into the cream cheese without deflating the fluffy texture.
See the recipe card below for exact ingredient amounts, nutritional information, and detailed instructions.
Variations
- Oreo crust: Swap the graham crackers for about 2 cups of crushed Oreos for a chocolatey twist that pairs well with the pumpkin filling.
- Ginger snap crust: Replace the graham crackers with an equal amount of crushed gingersnap cookies for a spicier, ginger-forward crust.
- Caramel drizzle: Drizzle 2-3 tablespoons of caramel sauce over the cheesecake just before serving for a sweet finish.
- Toasted pecans: Sprinkle ¼ cup of chopped, toasted pecans over the whipped topping for a little crunch and nutty flavor.
How to Make No-Bake Pumpkin Cheesecake
Before you get started on this no-bake pumpkin cheesecake, crush your graham crackers and melt the butter so you can make the crust.

Step 1: Make the crust. Combine the melted butter with the graham cracker crumbs, sugar, and pumpkin spice.

Step 2: Form in the pan and chill. Press the mixture firmly and evenly into the bottom and sides of the pie plate, and then place the crust in the fridge for at least an hour.

Step 3: Beat the cream cheese. Beat the softened cream cheese with the milk and sugar until smooth.

Step 4: Add Cool Whip and chill. Fold in the whipped topping and then spread it over the crust. Put it back in the refrigerator while you work on the next layer.

Step 5: Beat the pudding and milk. Beat the pudding mix and milk in a separate bowl until it's smooth and slightly thickened.

Step 6: Add the pumpkin. Fold in the pumpkin puree and pumpkin pie spice until well blended.

Step 7: Spread it on the cheesecake. Grab your cheesecake and spread the pumpkin layer on top.

Step 8: Finish with more Cool Whip. Now spread the remaining Cool Whip on top of the pumpkin cheesecake, then chill for about 2 hours before serving. Then, enjoy a slice with a pumpkin spice latte.
Make-Ahead Tips for Thanksgiving
This no-bake pumpkin cheesecake with pudding mix is easy to prepare 1-2 days before Thanksgiving, so you can save oven space for the turkey and sides.
- 2-5 days before: Shop for ingredients, make sure you have 3 ½ cups of whipped topping, and transfer it from the freezer to the fridge to thaw the night before you plan to make it.
- The day before: Soften the cream cheese, make and chill the crust, then layer on the cream cheese filling, pumpkin pudding, and whipped topping. Cover and refrigerate overnight (at least 2 hours) to let the filling set.
- Thanksgiving day: Keep the cheesecake refrigerated until dessert, saving oven and counter space for the turkey and sides. Wipe the knife between slices for clean, pretty layers.
- Freezing ahead: Let the cheesecake fully set in the fridge, then wrap well and freeze for up to 2 months. Thaw for about an hour before serving.
- Storage note: The cheesecake keeps in the fridge for 3 days, so making it more than 2 days ahead leaves less time to enjoy any leftovers.
I love having dessert ready before the turkey even goes into the oven. It makes Thanksgiving feel a little less hectic, and I can enjoy time with my family instead of worrying about one more dish.
Expert Tips
- Use a store-bought crust: For a shortcut, use a prepared graham cracker crust instead of making your own. It saves prep time and still gives you that classic graham cracker flavor.
- Try fresh pumpkin: You can use homemade pumpkin puree, but blot it with paper towels or drain it well first to remove excess moisture so the filling sets properly.
- Storage directions: Cover and refrigerate the cheesecake for up to 3 days. To freeze, let it fully set in the fridge first, then wrap it well and freeze for up to 2 months.
If you're looking for more no-bake pumpkin desserts, I highly recommend this easy pumpkin fluff dessert.

Serving Suggestions
- Serve at Thanksgiving: This cheesecake is a great alternative to traditional pumpkin pie. Pair it with upside-down apple crumble for a dessert table with a mix of creamy and crumbly textures.
- Pair with a fall drink: Serve slices with apple cider slushies for a refreshing, cinnamon-spiced drink that complements the pumpkin filling.
- Build a holiday dessert platter: Cut the cheesecake into smaller slices and serve it alongside pumpkin snickerdoodle cookies and pecan pie brownies for a dessert spread with different textures and flavors.
No-Bake Pumpkin Cheesecake Recipe FAQs
The cheesecake needs about 2 hours in the fridge to set. For a firmer filling and cleaner slices, I recommend making it a day ahead and letting it chill overnight.
Excess moisture in the pumpkin puree or using cook-and-serve pudding instead of instant pudding can keep the filling from setting properly. Blot or drain watery pumpkin puree before using it, and beat the filling until smooth.
Yes! If you're making the crust from scratch, you can assemble the cheesecake in a springform pan. A springform pan also makes it easier to remove the cheesecake and serve neat slices. This won't work with a store-bought graham cracker crust.

More Delicious No-Bake Cheesecake Recipes


If you try this recipe and love it please leave a star rating in the recipe card below or even better, drop a review in the comment section. I always appreciate your feedback. Be sure to follow along with me on Facebook, Pinterest, and YouTube for more easy recipes!
No-Bake Pumpkin Cheesecake
Equipment
- Hand mixer or Stand Mixer
Ingredients
Graham Cracker Crust
- ½ cup butter
- 1 ¾ cups graham cracker crumbs
- ⅓ cup sugar
- 1 teaspoon pumpkin pie spice
Cheesecake Layer
- 4 ounce cream cheese, softened
- 1 tablespoon milk
- 1 tablespoon sugar
- 1 ½ cups frozen whipped topping, thawed
Pumpkin Layer
- 2 boxes (3.4 oz) instant vanilla pudding powder 4 serving size
- 1 cup milk
- 1 tablespoon pumpkin pie spice
- 1 can (14 oz) pumpkin
Topping
- 2 cups frozen whipped topping, thawed
Instructions
Graham Cracker Crust
- In a microwave safe dish, or using a saucepan over medium heat, melt your butter.
- In a good-sized mixing bowl, add Graham cracker crumbs, pumpkin pie spice and sugar. Stir until blended.
- Pour melted butter all over your Graham cracker crumbs and sugar. Stir to combine.
- Press crumb mixture firmly into the bottom and sides of a 9-inch pie plate. Do your best to firmly press the crumb mixture down so it will form a solid crust to hold your slice of pie. Also, try and make the surface as smooth and flat as possible.
- Refrigerate for at least 1 hour, if not two.
Cheesecake Layer
- In a medium-sized bowl, beat cream cheese, sugar and milk until smooth. Gently fold in whipped topping.
- Spread on top of your crust. Again, try and make the surface as smooth and flat as possible.
- Refrigerate until you are ready to add the next layer.
Pumpkin Layer
- In a medium-sized bowl, beat milk and pudding powder together until smooth.
- Add canned pumpkin and spice. Using a large spoon, stir until blended together.
- Pour out and spread all over the first layer, as flat and as evenly as possible.
Topping
- Spread your thawed whipped topping over the top of your pie. Make whatever pattern you want with the whipped topping, if you want to make a pattern at all!
- Refrigerate or freeze until ready to serve.
- Enjoy every bite!
Video
Notes
- To prevent a runny pumpkin layer, drain watery pumpkin puree before using it, and be sure to use instant pudding mix, not cook-and-serve. Beat the filling until smooth to help it set properly.
- Swap in a prepared graham cracker crust to save prep time while keeping that classic graham cracker flavor.
- On the day you plan to serve the no-bake pumpkin cheesecake, keep it in the refrigerator until you're ready to slice it.
Nutrition
This post was originally published, 6/10/23. It's been updated with new content and images.

Coco says
Sometimes, ya just gotta do what ya gotta do. All I had in my, generally filled- to-the-brim, pantry was one vanilla and one banana instant pudding mix, so I just went with it. Though the banana flavouring was a bit much, it was still a delicious new comer to our Canadian Thanksgiving dinner. I absolutely love your Kitchen Diva recipes because so many of the recipe ingredients are items you'll find in most bakers stock pile. Thanks so much.
Karin and Ken says
I would have done the exact same thing. Thank you for your kind words you just made my day. All the best. Karin
Thea says
I really like your recipe and have made it several times all year. It’s easy and always tastes great. Thank you for sharing. 💕
Karin and Ken says
I’m so glad you’re enjoying this recipe! We love it too. Thank you for taking the time to let me know. Hopefully you find some other recipes on this site that you enjoy just as much. Take care. Karin
Mertyle says
GREAT IDEA!! LOVED EVERY LAYER!!! WILL DEFINITELY MAKE AGAIN!!
Karin and Ken says
So funny! I can’t figure out which layer is my favorite! I think they all go beautifully together too! Glad you will make the recipe again! Hearing that truly makes my day! All the best. Karin
Sheilagh says
So easy to make and we loved it Thanks for sharing.
Karin and Ken says
I can’t believe how easy it is to make either! This recipe is a definite favorite around here! I can’t thank you enough for taking the time to let me know! I am truly grateful! Take care and all the best to you! Karin
Lana says
Absolutely perfect for holiday dinner. Everybody loved it. No leftovers. Grandkids wanted seconds. I should have made 2! I will next time. Thank you for the recipe.
Karin and Ken says
I wonder if the lady who doubled the recipe and put it in a 13x9 pan tried it and wouldn’t l mind letting us know how it went. I haven’t had a moment to try it yet! I will be trying it over the holidays and will let you know how it went. I would rather make one big pie instead of 2! Regardless I am so happy to hear everyone loved it! Take care and be well. Karin
Susan says
This pie is so easy and tasted so good. Everyone loved it. Thank you for sharing!
Karin and Ken says
You are most welcome! So glad to hear you enjoyed it! We love this pie recipe around here! Take care and be well. Karin
nancy says
Hi, this recipe looks scrumptious. I want to take to a luncheon and was wondering how this would fit into a 9/13 pan if I doubted the recipe? I hope it would work nicely, what do you think? Also the next question is. The canned pumpkin that you use, is it pumpkin pie flavored pumpkin or just plain canned pumpkin?? Thank you so much for your answers. This luncheon comes up soon like in ten days. Can't wait to try this! Thank you again for the recipe and for the answers to my two questions.
Karin and Ken says
I have to tell you this pie is delicious! What a great idea to double the recipe and use a 9x13 inch pan. I am going to remember that and do it myself next time I make it because I can never seem to make enough! I’m sure the first slice will be a mess but after that I’m sure the other slices will be just fine! That always happens to me with lasagna and most things no matter how hard I try! Also just use plain canned pumpkin. I will change the recipe to be more specific. I apologize for the confusion! I hope you enjoy this dessert at your luncheon. Please, if you have a moment, let me know how it goes. I would love to hear what you thought about this dessert. Take care and all the best to you. Karin