These easy no bake Banana Pudding Cups are creamy, delicious, and incredibly simple to prepare. Layers of crushed cookies, sliced bananas, creamy pudding, and whipped cream are served up in individual dessert cups! No need to share here - everyone gets there own to enjoy.

Jump to:
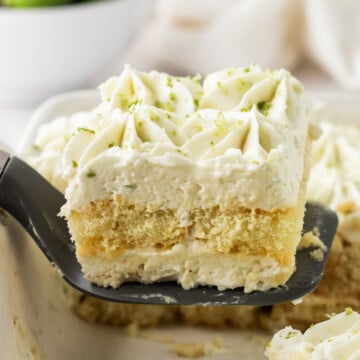
Love easy desserts? These no-bake Banana Pudding Cheesecake Cups are a dreamy mash-up of two favorites-banana pudding and creamy cheesecake-layered into the perfect little mini trifles.
They're simple enough for a weeknight sweet tooth but cute and fancy enough for parties, showers, or holidays. Each cup is a creamy combo of ripe bananas, fluffy cheesecake filling, and classic vanilla wafers. No oven needed!
You can make this in a big 13x9 dish, but I'm all about the individual servings-mason jars, dessert cups, even wine glasses work. Personal-sized and party-ready!
I absolutely love banana desserts. If you do too, you'll want to check out these recipes for Banana Egg Rolls, Banana Pudding Layer Cake, and these delectable Banana Cookies.
Why You Will Love This Recipe
- No oven needed: This no-bake dessert keeps things cool, simple, and summer-ready.
- Kid-approved: Creamy, sweet, and fun to eat-your little ones will be obsessed.
- No portion drama: Individual cups mean no more sibling showdowns over who got more like our tiramisu cups.
- Cool, creamy perfection: That banana pudding cheesecake layer? Absolute magic.
Ingredients
Everything you need to make these mini banana pudding cups is readily available at your grocer and probably already in your kitchen. It has just about the easiest list of ingredients you'll find.

- Instant Banana-Flavored Pudding: Adds that classic banana flavor and creamy texture-use instant (not cook-and-serve) for a true no-bake dessert. You can also use vanilla pudding with some banana extract added.
- Cold Milk: Helps the pudding set-use whole or 2% milk for best results. I find that non-dairy milks can be hit or miss.
- Cream Cheese: Gives the cheesecake layer its rich, tangy flavor-make sure it's softened for easy mixing.
- Powdered Sugar: Sweetens the cheesecake mixture without any graininess-don't sub with granulated sugar.
- Vanilla Extract: Rounds out the flavor and adds a cozy depth-pure vanilla is best, but imitation works in a pinch.
- Whipped Topping: Lightens the filling and adds that fluffy, mousse-like texture-Cool Whip or homemade whipped cream both work.
- Vanilla Wafer Cookies: Layered for texture and flavor!
- Banana Slices: Add natural sweetness and freshness-use ripe (not mushy) bananas and dip in lemon juice to prevent browning.
See the recipe card below for the full list of ingredients and exact quantities of each one.
Variations
- Pudding: Swap out the banana pudding for chocolate or butterscotch pudding and top with OREO cookies.
- Vanilla Wafer Cookies: Substitute with graham crackers, gingersnap cookies, butter cookies or any cookie you like.
- Add a Topping: Sprinkle shredded coconut over the top for a tropical taste. Add a drizzle of chocolate, strawberry or caramel syrup.
If you love recipes like this, you may also like Chocolate Strawberry Layered Pudding, No Bake Pumpkin Cheesecake or our Pistachio Fluff recipe.
How to Make Banana Pudding Cups
Here are the step-by-step instructions for making this easy no-bake banana pudding trifle.

Step 1: Make the pudding. Whisk together the instant banana pudding and milk. Once mixed, cover and refrigerate until thickened.

Step 2: Beat the cheesecake layer. Beat the cream cheese together with the powdered sugar and vanilla extract until smooth.

Step 3: Add the whipped cream. Beat all but a ¾ cup of the whipped topping into the cream cheese mixture until smooth and creamy.

Step 4: Slice the bananas. Slice your bananas into pieces about a ½ inch thick.

Step 5: Assemble the cups. Crush 30 cookies in a resealable bag and divide them evenly amongst the cups.

Step 6: Add the pudding. Evenly divide the pudding on top of the cookie layer in the cups. Then, crush the remaining 30 cookies in a resealable bag and divide evenly over the top.

Step 7: Add the cheesecake layer. Spoon the cheesecake mixture into the cups. Cover and refrigerate to allow the cookies to soften. When ready to serve, lay about 5-6 slices of banana flat on top of the pudding.

Step 8: Finish and garnish. Top with a generous dollop of whipped topping on each and garnish with a wafer and banana slice. Serve and enjoy!

Recipe Tips
- Chill the Pudding First: Once you mix the pudding and milk, let it sit in the fridge for a bit to thicken up before layering.
- Use a Mixer for Creaminess: Use an electric mixer to blend the cream cheese and sugar-this helps eliminate lumps and makes the mixture super smooth.
- Slice Bananas Just Right: Cut bananas into ½-inch thick slices so they hold their shape and don't get mushy in the cups.
- Let it Set Before Serving: For the best flavor and texture, refrigerate the assembled dessert cups for an hour or two to let the cookies soften and flavors meld.
Storage
- Refrigerator: Store in an airtight container in the refrigerator for up to 2 days, including the day you made it.
- Freezer: I don't recommend freezing this dessert. No worries, you're not likely to have any leftovers!

Recipe FAQs
Either wait to slice the bananas when you are ready to use them or toss them in a little lemon juice if you want to slice them up ahead of time.
You can definitely make each layer thinner in each cup and repeat the layers in this order: crushed cookies, pudding, banana slices and cheesecake layer until you are close to the top of each cup. Remember you need space to add whipped topping on top of each.
Absolutely! If you want to skip the individual cups you can make this banana pudding dessert in a 9 x 13 dish. Follow the same instructions for the order of layering.
Banana Pudding Cheesecake Trifle Video

More Recipes That Use Banana Pudding
Do you like banana pudding? Here some recipes you may also like to try.


If you try this recipe and love it please leave a star rating in the recipe card below or even better, drop a review in the comment section. I always appreciate your feedback. Be sure to follow along with me on Facebook, Pinterest, and YouTube for more easy recipes!

No Bake Banana Pudding Cups
Equipment
- 18-20 9 oz disposable cups or 13 x 9 inch pan
Ingredients
- 2 3.4-ounce packages instant banana pudding or vanilla or your favorite flavor
- 4 cups cold milk
- 1 8-ounce bricks cream cheese, softened
- ⅓ cup powdered sugar
- 1 teaspoon vanilla extract
- 1 12-ounce tub whipped topping, thawed or 16 oz with some leftover usually
- 1 15-ounce box vanilla wafer cookies divided
- 4-6 large bananas
Garnish
- vanilla wafer cookies crushed or full
- banana slices
Instructions
- In a medium mixing bowl, whisk together the instant banana pudding and milk. Cover and refrigerate until thickened.
- In a large mixing bowl, beat the cream cheese together with the powdered sugar and vanilla extract until smooth. Once smooth and creamy, add 1 ½ cups of whipped topping and beat until blended. Reserve remainig whipped topping for decoration and set aside.
- Peel the bananas and slice into ½ inch thick rounds if making Trifle or serving cups right away, otherwise wait to cut bananas before serving cups.
20 Individual 9 oz Cups
- Prepare 30 wafer cookies by crushing them in a resealable bag to resemble a chunky texture.
- Divide crushed wafer cookies onto the bottom of each of your cups.
- Evenly divide the pudding on top of the cookie layer inside each cup.
- Crush remaining 30 cookies in a resealable bag then divide evenly amongst cups.
- Add "cheesecake" layer divided evenly to all of your cups.
- Cover and refrigerate to allow the cookies to soften, if needed. Ideally no more than 1-2 hours.
- Right before serving lay 5-6 slices of banana flat on top of the cheesecake layer.
- Place a generous dollop, or piping of whipped topping on each cup and garnish with a wafer and banana slice, if desired. Serve.
Large Pan Trifle
- Line a 3-quart 9x13 inch glass dish with a single layer of the vanilla wafer cookies. Pour the prepared banana pudding recipe over the cookies and gently spread out evenly with a spatula.
- Add the bananas to the dish over the vanilla layer.
- Dollop the "cheesecake" mixture over top of the bananas and use a spatula to very gently spread until the dollops meet and the cheesecake layer is evenly spread over all of the bananas.
- Top the cheesecake layer with an even layer of the vanilla wafer cookies.
- Right before serving, scoop the reserved whipped topping into a small resealable bag and cut off the corner to create a piping bag. Decorate the top of the dessert with the whipped topping, banana slices and crushed or whole cookies, if desired.
Video
Notes
- Chill the Pudding: After mixing the pudding and milk, let it sit in the fridge to thicken.
- Use an Electric Mixer: It's the best way to get a smooth, creamy blend of cream cheese and sugar-hand mixing just doesn't cut it.
- Slice Bananas Thick: Cut bananas about ½ inch thick so they keep their shape and don't turn to mush.
- Refrigerate Before Serving: Chill the assembled cups for 1-2 hours to let the flavors meld-just don't go too long or the wafers will get soggy.
- Add Wafers Last: Top with cookies right before serving to keep them crisp.
Nutrition
This post was originally published in November 2022. It's been updated with new content and images.
Rita says
So tasty. The perfect dessert and I’m not kidding. We all loved it and I will be making this again and again lol Thank you for sharing it. ❤️
Karin and Ken says
It’s a personal favorite of mine. I’m so glad you’re loving it too. All the best. Karin
Kay says
All I can say is YuM! This stuff is addictive and impossible to stop eating. Cheap and easy. TFS.
Karin and Ken says
I could not agree with you more!! All the best. Karin
Samantha says
Wow! Easy and delicious. The hit of the party! This recipes a keeper. Thx for sharing Karin. Keep up the great work!!!
Karin and Ken says
Thank you for your kind words! As always I try my best! I love this recipe myself! All the best. Karin