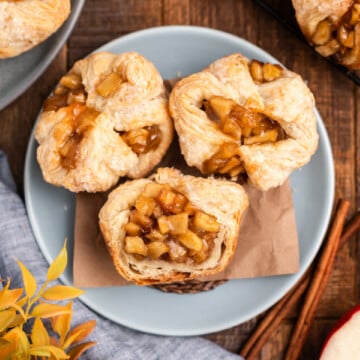
Curious how to make cakesicles or how to make cake popsicles? You'll love this amazing cakesicles recipe using brownies and a cakesicles mold.
In my opinion, there really is no better way to profess your love on Valentine's Day, or any other day of the year, than with these gorgeous brownie cakesicles!
Don't you agree?

What are Cakesicles?
Even if you haven't heard of the term "cakesicles" before I guarantee you already understand the basics of this fun dessert. Cakesicles are a fun twist on a traditional cake pop, which is a fun twist on a traditional cake.
If you've ever wondered how to make cakesicles or how to make cake popsicles-with either cake or brownie-you're in the right place. All you need is cake, chocolate, sprinkles, wooden sticks and a silicone cakesicles mold for this simple cakesicles recipe.
You create brownie cakesicles in popsicle cake molds, also called cakesicles molds, covered in a decadent chocolate shell, which surrounds the cake or brownie inside.
With these brownie cakesicle molds life just got a bit easier for everyone!
Your cakesicle mold must have four or eight places and holes for popsicle sticks.
Now you have one decision left to make.
To Dip or Not to Dip. That is the Question.
My close friend Julie and I still debate over the best way to prepare this cake or brownie cakesicles recipe.
She has been making cake pops forever and always dips them. Likely always will.
Julie uses her cakesicle mold only to shape her creations. Then, she dunks each dessert in melted chocolate and allows them to harden on parchment paper inside her fridge or freezer.
After they harden, she decorates.
The second option, and my personal favorite, is to paint the inside of the mold with chocolate, allow it to set, add cake or brownies, add more chocolate to cover and once set, decorate.
In my opinion the second option is so much easier and you experience success every time.
Dipping Method
Dipping allows you to control the thickness of your outer chocolate coating better, especially if you want a thin coating or want to dunk into different coatings, say have a chocolate layer and a caramel or peanut butter layer using different kinds of chocolate chips.
You need a strong and sturdy cake or brownie inside if dipping so the cake holds onto the stick while dipping. However, it might not be as tasty if cake or brownie is really dense.
It's possible that the outside chocolate surface will not be smooth, depending on how smooth you can make your brownie cakesicle underneath.
Dipping can be wasteful because you need to melt lots more chocolate for totally dunking your popsicle cake pop creations.
In Mold Method
Here are the benefits of the "in-mold method."
- all cakesicles are an even, uniform shape
- inside does not need to be as dense because of strong outer shell so removing cakesicles from mold is not a problem
- end up with a thicker outside coating by painting with chocolate twice to make sure shell is strong
- slightly more difficult in a way to make and takes a little longer but I LOVE this method because it is foolproof.

These cakesicles are a great way to say "I love you" to that special someone on Valentine's Day. Other sweet desserts you can give with these are my Valentine's Rice Krispie treats and my Valentine's Day sugar cookies. Throw in some coconut candies and you'll be in the good books all the way until next year.
Cakesicles Ideas to Try
There are all sorts of amazing cakesicles ideas you can try, once you nail the basics. Here are just a few examples to get your creative juices flowing.
- Unicorn, think white chocolate with light blue and pink
- Halloween, maybe a scary face, pumpkin or dripping blood
- Cosmic-imagine a solar system, a mess of bright color on the outside of your chocolate shell with colored white chocolate
- Strawberry shortcake, use strawberry shortcake inside a
- Birthday cake, add sprinkles on the inside
- Christmas, cake of any color, dipped and decorated with green chocolate like a tree and decorated with colorful candies
- and so many more...
Cakesicle or Brownie Cakesicle Decorating Idea
By using food safe paint brushes, you can easily "paint" some cool designs into the cakesicles or brownie cakesicles mold first.
You can make a specific drawing with colored chocolate or regular chocolates or even a multicolor mishmash of color for a more psychedelic or simply colorful look.
After decorations are set and cool, add the chocolate layer that will become the outer shell.
Your other option is to decorate your cakesicle after the outer shell has hardened, one at a time. I have found this method difficult but it does work for some so worth considering.
Just remember that your design will be the reverse, like looking in a mirror, once your brownie cakesicle is ready to eat.
Today I'm going to show you how to make cakesicles for Valentine's Day. This is such a fun cakesicles recipe you can customize to literally any occasion!
It's all in how you decorate them and there are so many options. The possibilities are truly endless.

Tip 1: Use High-Quality Chocolate
For the best results for your chocolate coating, use a good quality chocolate. I recommend any kind dark chocolate, milk or semisweet for best results.
Chocolate chips, baking chocolate or chocolate bars are usually an inexpensive option. However, you need to select a higher quality brand to avoid a waxy taste and difficulties melting.
Of course if it suits your themed design to work with a different type of chocolate that will still work, but dark chocolate (semisweet or bittersweet) makes a satisfying snap when you bite into it so it's worth keeping in mind!
Most grocery stores carry chocolate bars that are 65% cocoa (or more) that include cocoa butter to make melting easier and that's my recommendation when making this Valentine's Day cakesicles recipe.
Tip 2: Trim the Edges before Frosting
When making a cake, I usually will cut some off the edge before frosting and toss the pieces inside my freezer in a resealable bag or an airtight container.
This is just so when the craving hits I have some cake around to quickly make a few of these cakesicles. Or if making brownies, brownie cakesicles.

More Than Just Cake
My friend Julie insists I share with you how she stuffs her cakesicles or brownie cakesicles. She doesn't just use cake or brownie pieces in her cakesicle recipe.
She makes them just like she makes her cake pops, by combining her cake pieces with frosting. And let me tell you, she loves buttercream.
Julie uses a good-sized mixing bowl and breaks up all of her cake into smaller pieces.
Generally, a half a cup per cakesicle or brownie cakesicle mold. Giving an exact amount is impossible because everyone will pack their cake or brownie differently.
Next, tablespoon by tablespoon, she adds her room temperature frosting to her cake pieces.
Using her fingers, she carefully and gently blends the two together until frosting is throughout and the cake will hold together.
You will not need to add much buttercream frosting to make your cake pieces hold together.
Don't have Cake or Brownies? Try These Cakesicles Ideas!
For a nice change, you can always use a chocolate ganache filling, inside your brownie cakesicles recipe.
You follow the directions exactly and instead of adding cake, you add this.
- 1 ⅛ cup heavy whipping cream
- 2 and ⅔ cups (16 oz) semi-sweet chocolate, chopped
- 5 and ½ tablespoons unsalted butter, room temperature, cubed
Using a small saucepan, over low heat, bring cream to a boil and remove from heat.
Add semi-sweet chocolate and allow to sit for a couple minutes before whisking until smooth.
Whisk in butter.
Pour into a heat safe bowl and allow to cool.
Once cool, pour and spread into cakesicle molds. Refrigerate before completing the chocolate shell.
Serve and enjoy every bite!
Store these ganache cakesicles at room temperature for up to 5 days.

Valentine's Day Cakesicles or Brownie Cakesicles
Baking these cake pop popsicles is fun at any time of year, but I love theming them for holidays. So what transforms a regular brownie cakesicle into Valentine's Day brownie cakesicles?
The Color Red
Red represents life, love, war and death. You could summarize this to mean strong passion or emotion. You'd most often choose red on Valentine's Day to communicate strong affection and deep love.
The Color White
White is the color of purity, serenity and truth. Using white on Valentine's Day represents carefree, innocent love. White reminds us to embrace every moment.
The Color Pink
When you use the color pink you're subconsciously communicating "I appreciate you." And it's such a lovely combination of red and white! It's a color of gentle elegance, although the deeper shade of pink you go, the more passionate the appreciation is!
For more Valentine's Day brownie cakesicle ideas think about heart-shaped sprinkles, Cupid's arrows, roses and other pink, red or white flowers and of course Valentine's Day-themed messages written out with icing!
Other Delicious Valentine's Day Recipes to Try
Mini Pound Cakes with Strawberry Glaze
Chocolate Banana Pancake Pops
Valentine's Day Strawberry Hot Cocoa Bombs
Valentine's Layered Jello
Puppy Chow-Sweets for Your Sweetie
How Should I Decorate My Valentine's Day Cakesicles?
Once your cakesicles are out of the cakesicles mold, it's time to decorate!
An easy yet refined decorating technique is drizzling melted chocolate (or candy melts) in a contrasting color over your set cakesicles. You can also add heart-shaped sprinkles or other candies, which will stick to your treats once the drizzled melted chocolate hardens.
You can do all kinds of patterns or try your hand at some cursive writing and see where your creativity takes you.
How to Make Cake Popsicles
Cakesicles are a genius way to use leftover cake or brownies. When decorated, they look like popsicles but they're better because they don't melt!
These chocolate covered cakes on a stick may look intimidating at first glance but I promise, this simple cakesicles recipe is great for beginners.
And I love how you can impress your friends and family with your baking prowess! They'll think you're on deck to star in your own Netflix baking reality show!
If you're ready to learn how to make cakesicles, keep reading. It's a simple method involving tempering chocolate in the microwave, painting it into cakesicles molds and then filling the popsicle cake mold with either cake or brownies.
The cakesicles mold is really important to this cakesicles recipe. Using a silicone popsicle cake mold to layer the chocolate coating and cake inside gives you predictable and consistent popsicle cake pops.

Valentine Cakesicles or Brownie Cakesicles
Brownie
- 1 cup of dark chocolate broken into chunks-100g / 3.5oz (dark chocolate 65% for me)
- ½ cup of of unsalted butter-110g
- 2 eggs
- ½ cup of caster sugar-100g
- ½ cup of sieved all-purpose flour-60g
Shell
- 2.5 cups of white chocolate-250g / 8.8oz
Decoration
- Pink chocolate, ruby chocolate or pink candy melts
- Heart sprinkles
Material
- Ice cream silicone mould x 4 cavities of 90ml each (3.04oz)
- Wooden stick
How to Make Cakesicles | Cakesicles Recipe
Brownie
Prepare a brownie tin or a small roasting tin 5.5 x 8 inches (14 x 20cm). Melt the chocolate and butter over low heat.
In another bowl, combine sugar and eggs.
Add mixture to chocolate and flour too.
Stir until forms a smooth batter and pour into the prepared pan.
Bake for 15-18 minutes or until lightly crusty on the top but still a soft heart.
Don't over-bake the brownie. A slightly undercooked brownie is needed to achieve the perfect texture of each cakesicle.
Allow to cool completely inside the pan.
Shell
Melt white chocolate.
Pour some melted chocolate in each cavity of the mould to cover the entire surface.
Make sure to cover the bottom and the sides. Use the back of your spoon and/or turn around your mould to help to spread out the melted chocolate.
Now it's time to insert the wooden sticks. Don't forget them at this stage. It will be too late after that as the chocolate will harden.
Insert the sticks a quarter of way through the cavity.
Place the silicone moulds in the fridge for 25 minutes until the chocolate is set (or 15 minutes in the freezer).
Cake Pop Popsicle Tips
- Leave the white chocolate into a bowl of hot water to avoid letting it harden
- Wash your silicone cakesicles molds with hot water. They will stay warm and help the chocolate to spread better
- Make sure the layer of chocolate is not too thin or not too thick
Cake (after baking)
Once the cake is completely cool, break it apart and crumble it. You may want to use gloves at this stage.
Add together the pieces and mix with your hands until the cake comes together.
Filling
Fill each cavity with the cake until the top of the mold.
Make sure to get the filling all around the wooden stick.
Be careful not to press too much too hard to avoid chocolate cracking.
Back of the cakesicles
Spread a layer of melted white chocolate to cover the back of the cakesicles.
Make sure to cover every corner. You may need to use the back of a knife to get rid of any excess chocolate.
Place the silicone moulds in the fridge for 25 minutes or even more until the chocolate is set (or 15 minutes in the freezer).
Note: you may need to melt the white chocolate if it's already hardened.
Decoration
Carefully take the cakesicles off the molds.
Decorate with melted chocolate and heart sprinkles
Melt the pink chocolate and pour in a piping bag. Cut the tip and drizzle on the cakesicles.
Add the heart sprinkles straight away.
They will stick when the chocolate is set.
How to Store Cakesicles or Brownie Cakesicles
You can store your cakesicles or brownie cakesicles at room temperature, similar to the way you would store a cake or batch of brownies, in an airtight container.
Assuming there isn't anything else in your cakesicles besides cake or brownie and hardened chocolate, you can leave them at room temperature for about two days, including the day you make them.
You have to be careful about storing cakesicles or brownie cakesicles inside your fridge because expensive, real chocolate can accumulate condensation on their surface which can affect your enjoyment of this amazing dessert!
The problem with freezing these tasty treats is that if there is any moisture inside your densely-packed cakesicle or brownie cakesicle freezing can cause it to expand and break the outer chocolate shell.
Luckily, these cakesicles or brownie cakesicles never last long enough that storage is usually a problem!

How to Make Cakesicles and Brownie Cakesicles Video


Cakesicles or Brownie Cakesicles
Equipment
- cakesicle mold
Ingredients
Brownie
- 1 cup dark chocolate, broken into chunks dark chocolate 52% for me
- ½ cup unsalted butter
- 2 large eggs
- ½ cup caster sugar
- ½ cup sieved all-purpose flour
Shell
- 2 cups + ½ cup of white chocolate
Decoration
- Pink chocolate as ruby chocolate or pink candy melts
- Heart sprinkles
Equipment
- Ice cream silicone mould x 4 cavities
- Wooden popsicle sticks
Ganache Filling (Instead of Brownies)
- 1 ⅛ cup heavy whipping cream
- 2 ⅔ cups (16 oz) semi-sweet chocolate, chopped (not chocolate chips for best results)
- 5 ½ tablespoons unsalted butter, room temperature, cubed
Instructions
- Preheat the oven to 350°F/180°C.
- Get out and measure all of your ingredients.

- Line a brownie tin or a small roasting tin 5.5 x 8 inches (14 x 20cm) with parchment and/or cooking spray.
- Using a microwave safe bowl melt the dark chocolate and the butter in 20 second bursts, stirring in between each until melted. Your other option is to melt them together over a low heat. Stir frequently.
- Chocolate and butter must be meted.
- In another bowl, whisk together the sugar and the eggs.
- Add the mixture to the melted butter/chocolate. Add also the flour.
- Stir.
- Until you achieve a smooth batter.
- Pour the batter into the prepared tin.
- Bake for 15-18 minutes or until lightly crusty on the top but still a soft center. Don't over-bake the brownie. It will help to mix the brownie later and reach the right consistency for the filling.
- Let it cool completely in the tin.


Shell
- Slowly melt the white chocolate.
- Pour some melted chocolate in each cavity of the mould to cover the whole surface. Make sure to cover the bottom and the sides. Use the back of your spoon and/or turn around your mould to help to spread out the melted chocolate.
- It's time to insert the wooden sticks. Don't forget them at this stage. It will be too late after that as the chocolate will harden. Insert the sticks a quarter of way through the cavity.
- Place the silicone moulds in the fridge for 25 minutes until the chocolate is set (or 15 minutes in the freezer).


Cake (after baking)
- Once the cake is completely cool, break it apart and crumble it. You may want to use gloves at this stage.
- Add together the pieces and mix with your hands until the cake comes together.


Cake Filling
- Fill each cavity with the cake until the top of the mould.
- Make sure to get the filling all around the wooden stick. Be careful not to press too much too hard to avoid chocolate cracking.

Back of the Cakesicles
- Spread a layer of melted white chocolate to cover the back of the cakesicles. Make sure to cover every corner. You may need to use the back of a knife to get rid of any excess chocolate.
- Place the silicone moulds in the fridge for 25 minutes or even more until the chocolate is set (or 15 minutes in the freezer).

Decoration
- Carefully take the cakesicles out of the moulds.

- Decorate with melted chocolate and heart sprinkles:
- Melt the pink chocolate and pour in a piping bag. Cut the tip and drizzle on the cakesicles.
- Add the heart sprinkles straight away. They will stick when the chocolate is set.
- Enjoy every bite!


Ganache Filling (Instead of Brownies)
- Using a small saucepan, over low heat, bring cream to a boil and remove from heat.
- Add semi-sweet chocolate and allow to sit for a couple minutes before whisking until smooth.
- Whisk in butter.
- Pour into heat safe bowl and allow to cool.
- Once cool, pour and spread into cakesicle molds.
- Refrigerate before completing outer chocolate shell.
- Serveand enjoy every bite!
- Store these ganache cakesicles at room temperature for up to 5 days.
Video
Notes
Tips
- Let the white chocolate sit inside a bowl of hot water to avoid letting it harden.
- Wash your silicone moulds with hot water. They will stay warm and help the chocolate to spread better.
- Make sure the layer of chocolate is not too thin or not too thick.
- You may need to melt the white chocolate if it's already hardened.
Nutrition

Leave a Reply