Have you ever brought a rotisserie chicken home and just stared at it wondering where to start? If so, this step by step guide on How to Carve a Rotisserie Chicken is what you need. You'll learn how to make perfectly portioned breasts, thighs, drumsticks, and wings in only a few cuts. It's so easy that after you do it once, you'll never hack at a chicken again.

Recipe Essentials
- 🍽️ Course: Kitchen Basics / Meal Prep
- ⏱️ Cooking Time: Absolutely none
- 🍴 Servings: 4 servings depending on what you want to do with your chicken
- 🧄 Flavor Profile: Savory, juicy, tender
- 🍚 Best Served With: Tacos, salads, pasta, casseroles and more
- 🧊 Make Ahead?: Yes. Definitely perfect for weekly meal prep
Summarize and Save This Content On
It used to be that I would just pull pieces off with a fork or roughly cut with a knife but it was causing too much waste. Carving properly actually gives you more usable meat, looks way better and stretches your dollar further. A cooked rotisserie chicken is an amazing grocery store shortcut.
This was inspired by this slow cooker chicken broth from rotisserie chicken recipe and . It pairs well with this bell pepper salad or broccoli crunch salad.
Jump to:
Why You Will Love This Recipe
- More Meat: Proper carving ensures you remove the parts cleanly and don't leave tender meat behind.
- Saves Money: One chicken can easily become tacos, soups, salads, casseroles and more throughout the week.
- Quick and Easy: It's easier than you think to carve a rotisserie chicken. After you try it once you'll wish you did it sooner.
- Saves Time: Buying an already cooked chicken is a total time saver.
Ingredients
You only need a few simple tools and one store-bought rotisserie chicken. No fancy equipment required.
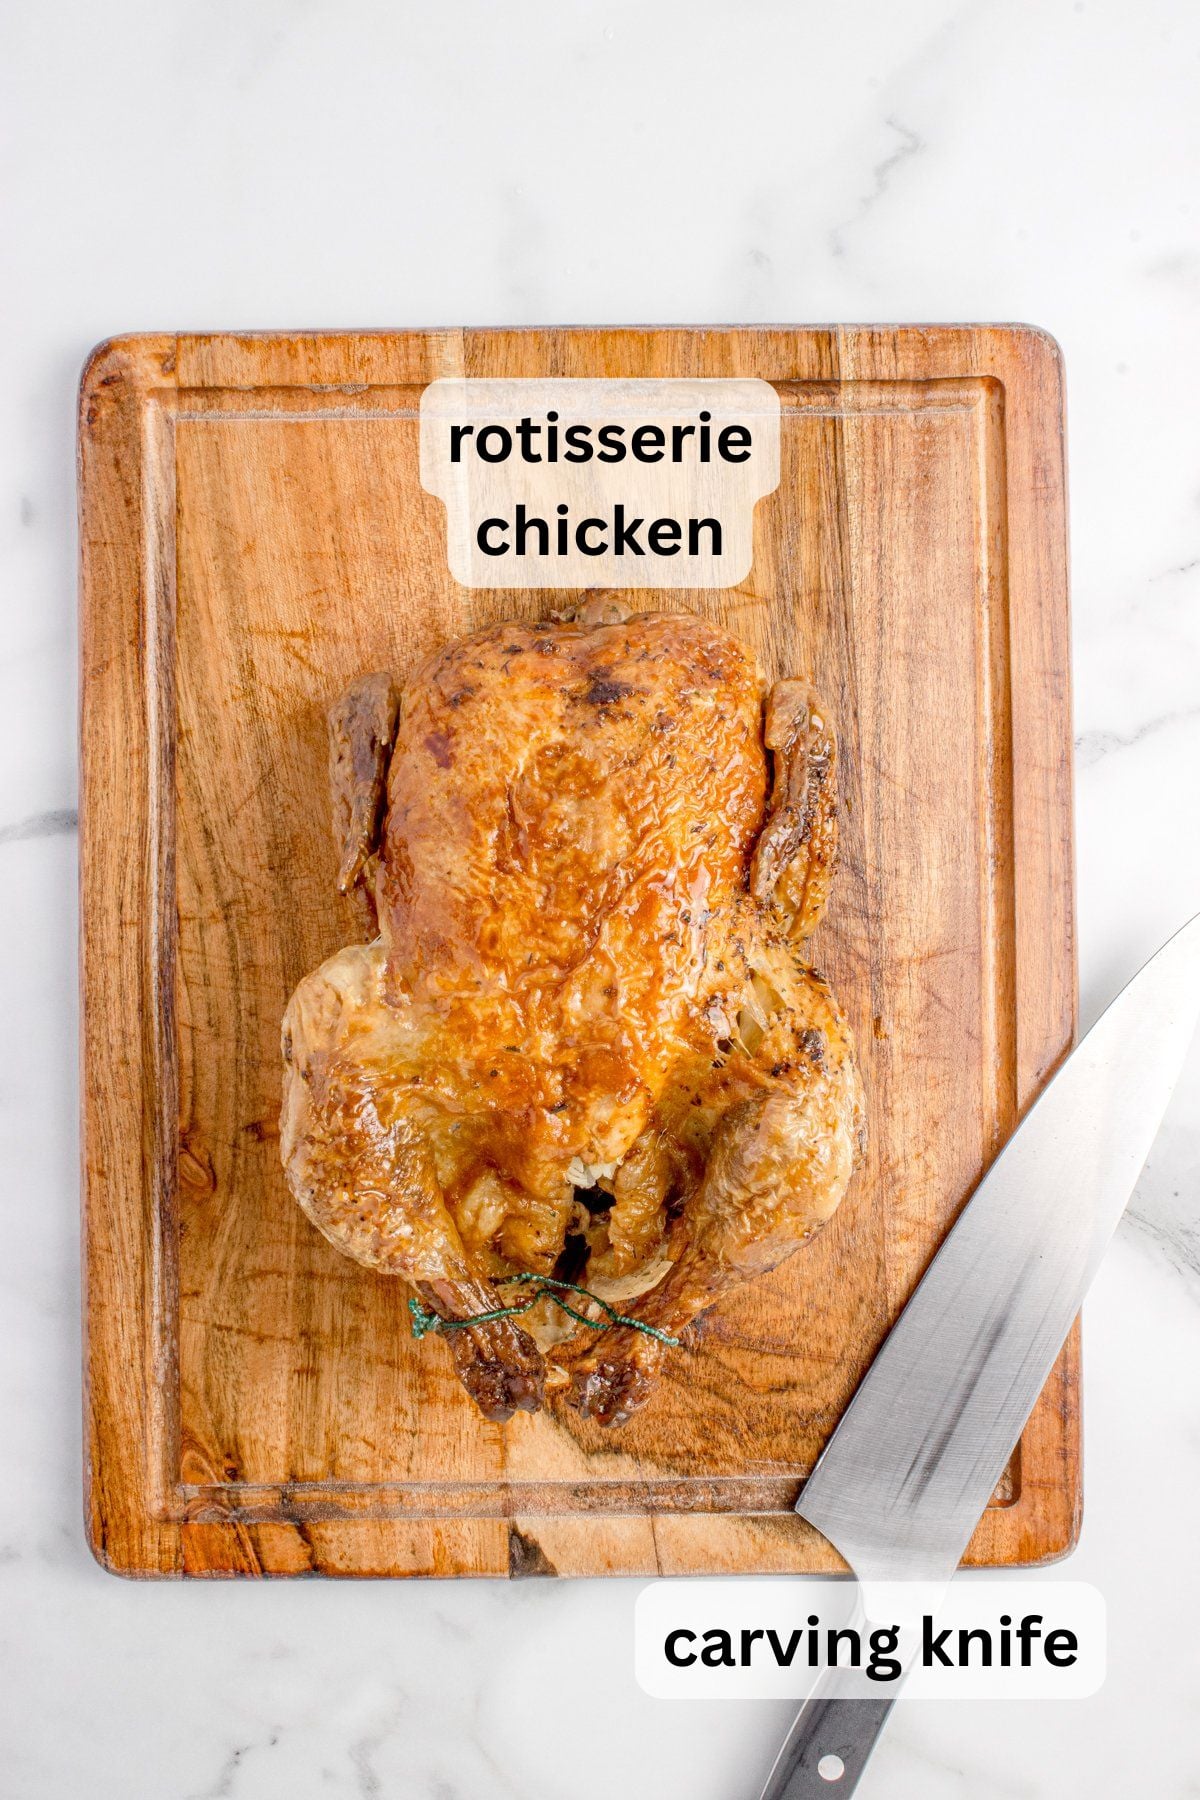
- Rotisserie Chicken: Slightly warm chickens are easier to carve. Pick a rotisserie chicken that has golden brown skin and find one that was cooked most recently.
- Sharp Chef's Knife: A sharp knife makes clean cuts.
- Cutting Board: To catch juices and little bits of chicken.
- Paper Towels: For gripping knife and keeping your board stable.
See the recipe card below for the exact quantities of each ingredient.
Variations
- Shred or Dice Instead of Keeping Them Whole : Store meat for rotisserie chicken tacos or soups. However you prefer.
- Skin-On or Skin-Off: Keep crispy skin attached or remove for leaner portions and to use in making broth afterwards.
- Debone Completely: Remove all meat from the carcass at once.
- Separate White and Dark Meat: Store separately for different recipes or needs.
Instructions
This step-by-step guide makes carving stress-free. Follow the joints, not the bones, and you'll be glad you tried to do this.
Step 1: Prep Your Station
Set a damp paper towel under your cutting board to keep it from sliding. This matters more than people think.
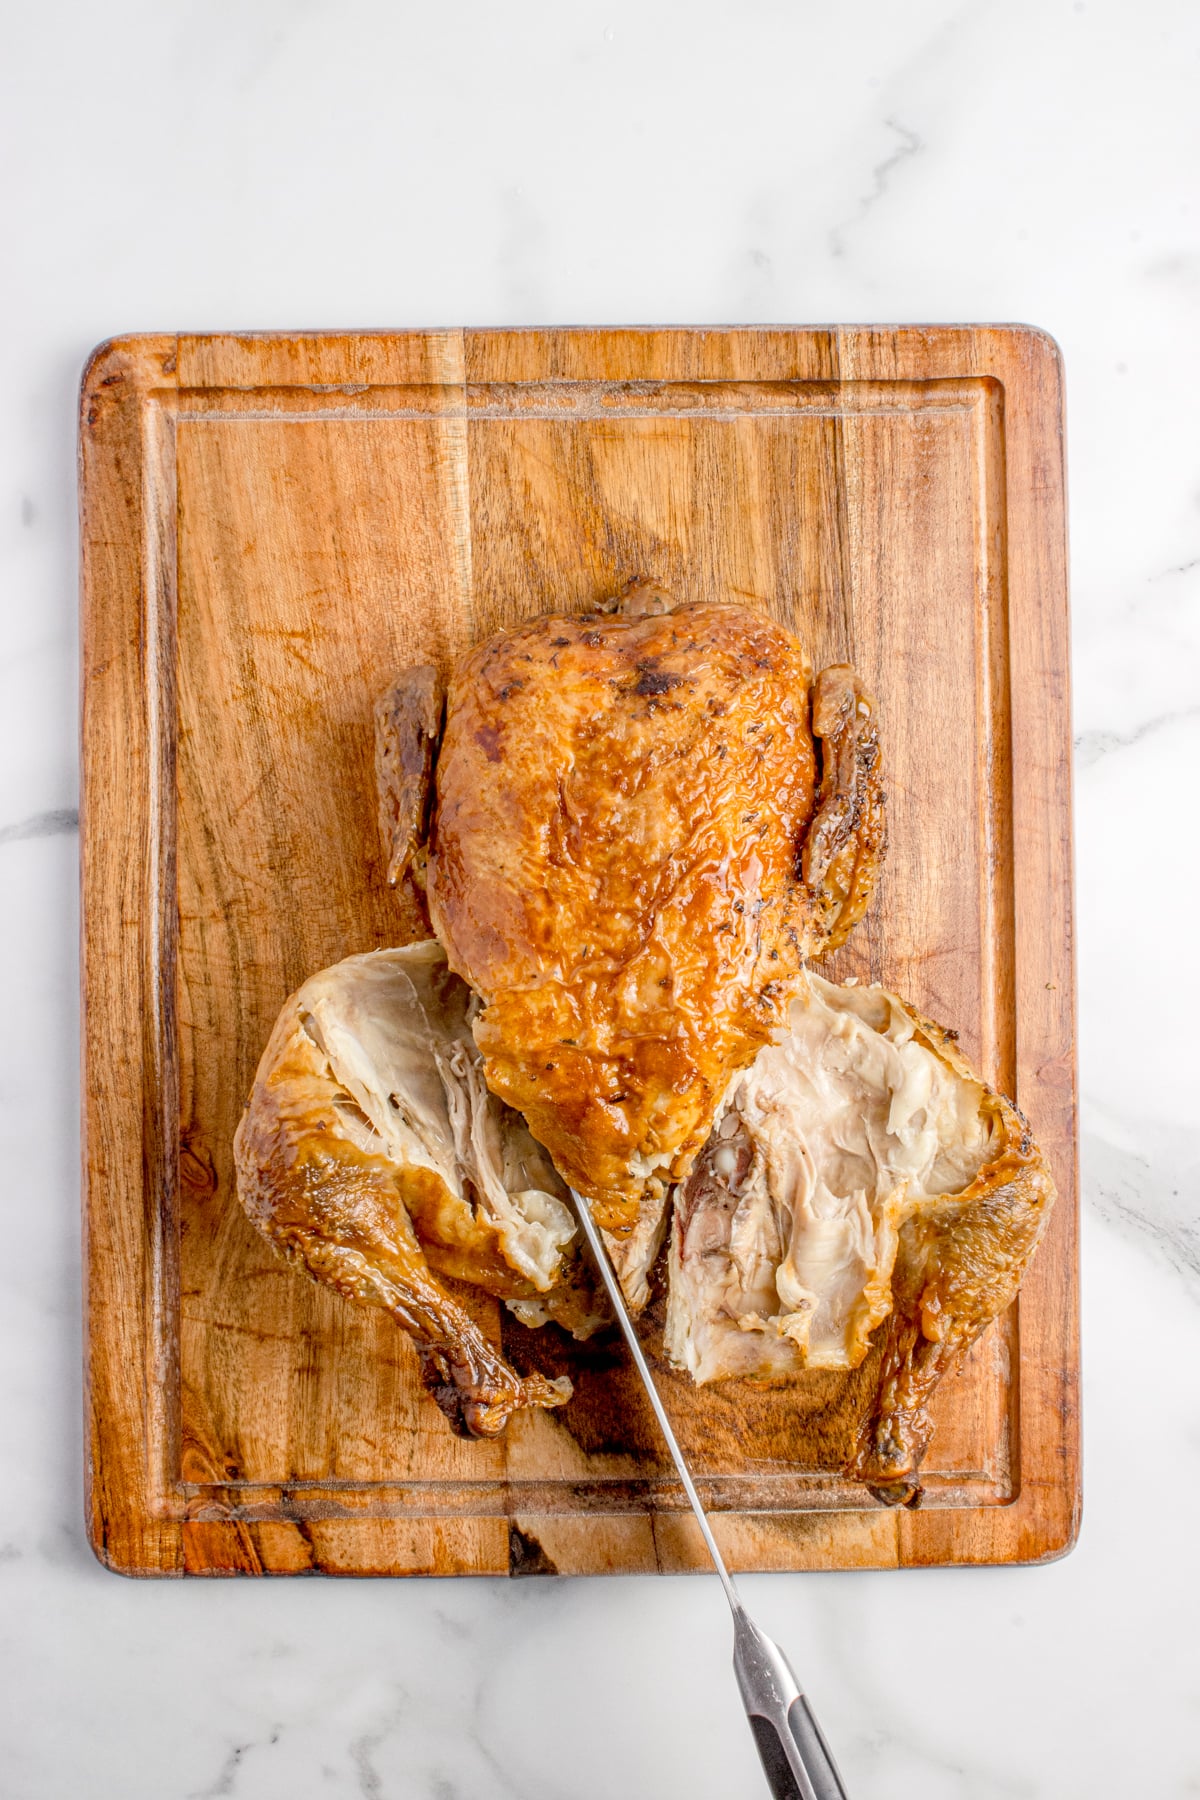
Step 2: Remove the Legs
Pull the drumstick away from the body and slice through the joint that's between the thigh and the body. Repeat this on the other side. If it doesn't go easily, adjust slightly and try again.
Slice through the skin between the thigh and the drumstick. Repeat this on the other side. If it doesn't go easily, adjust slightly and try again.
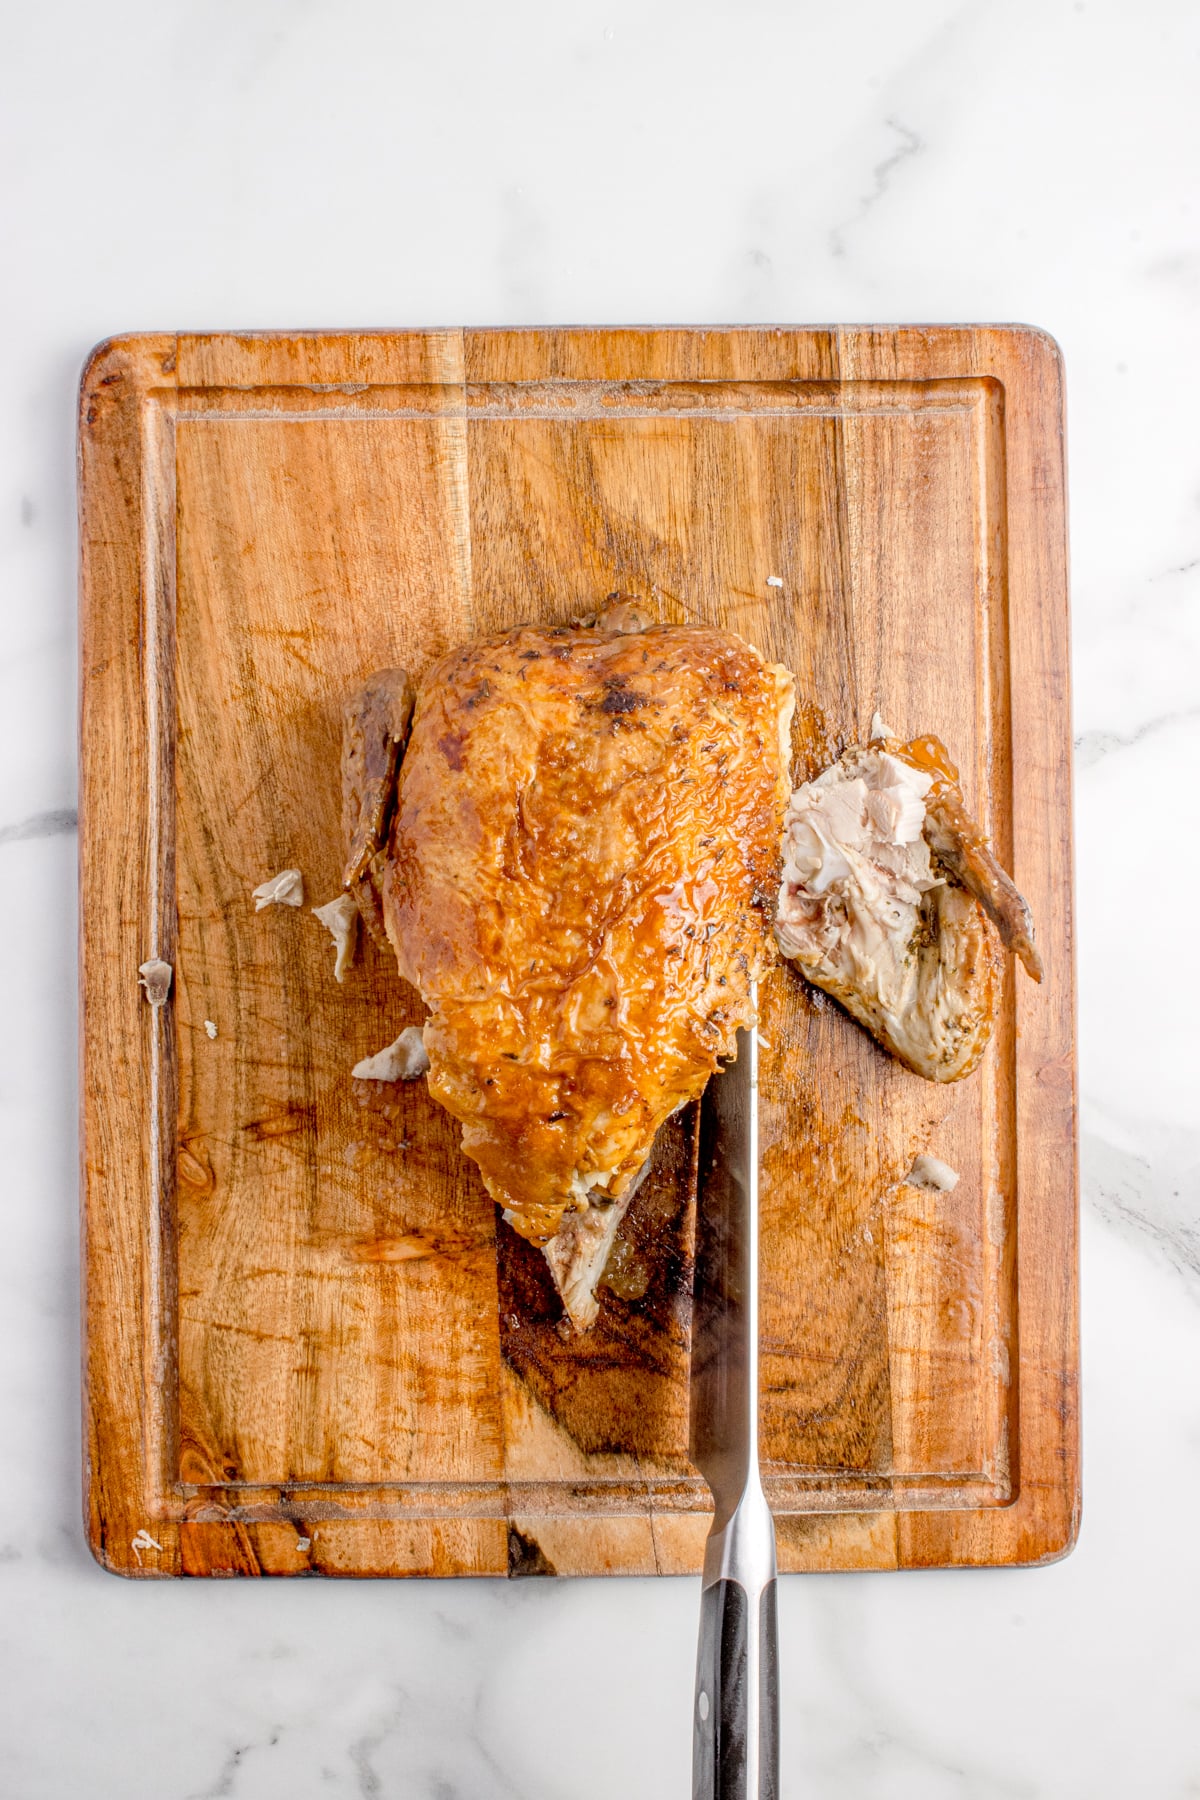
Step 3: Remove the Wings
Pull the wing away from the body and slice through the joint. Cut off the wing tip and save it for stock and then separate the drumette from the flat. Repeat this on the other side.
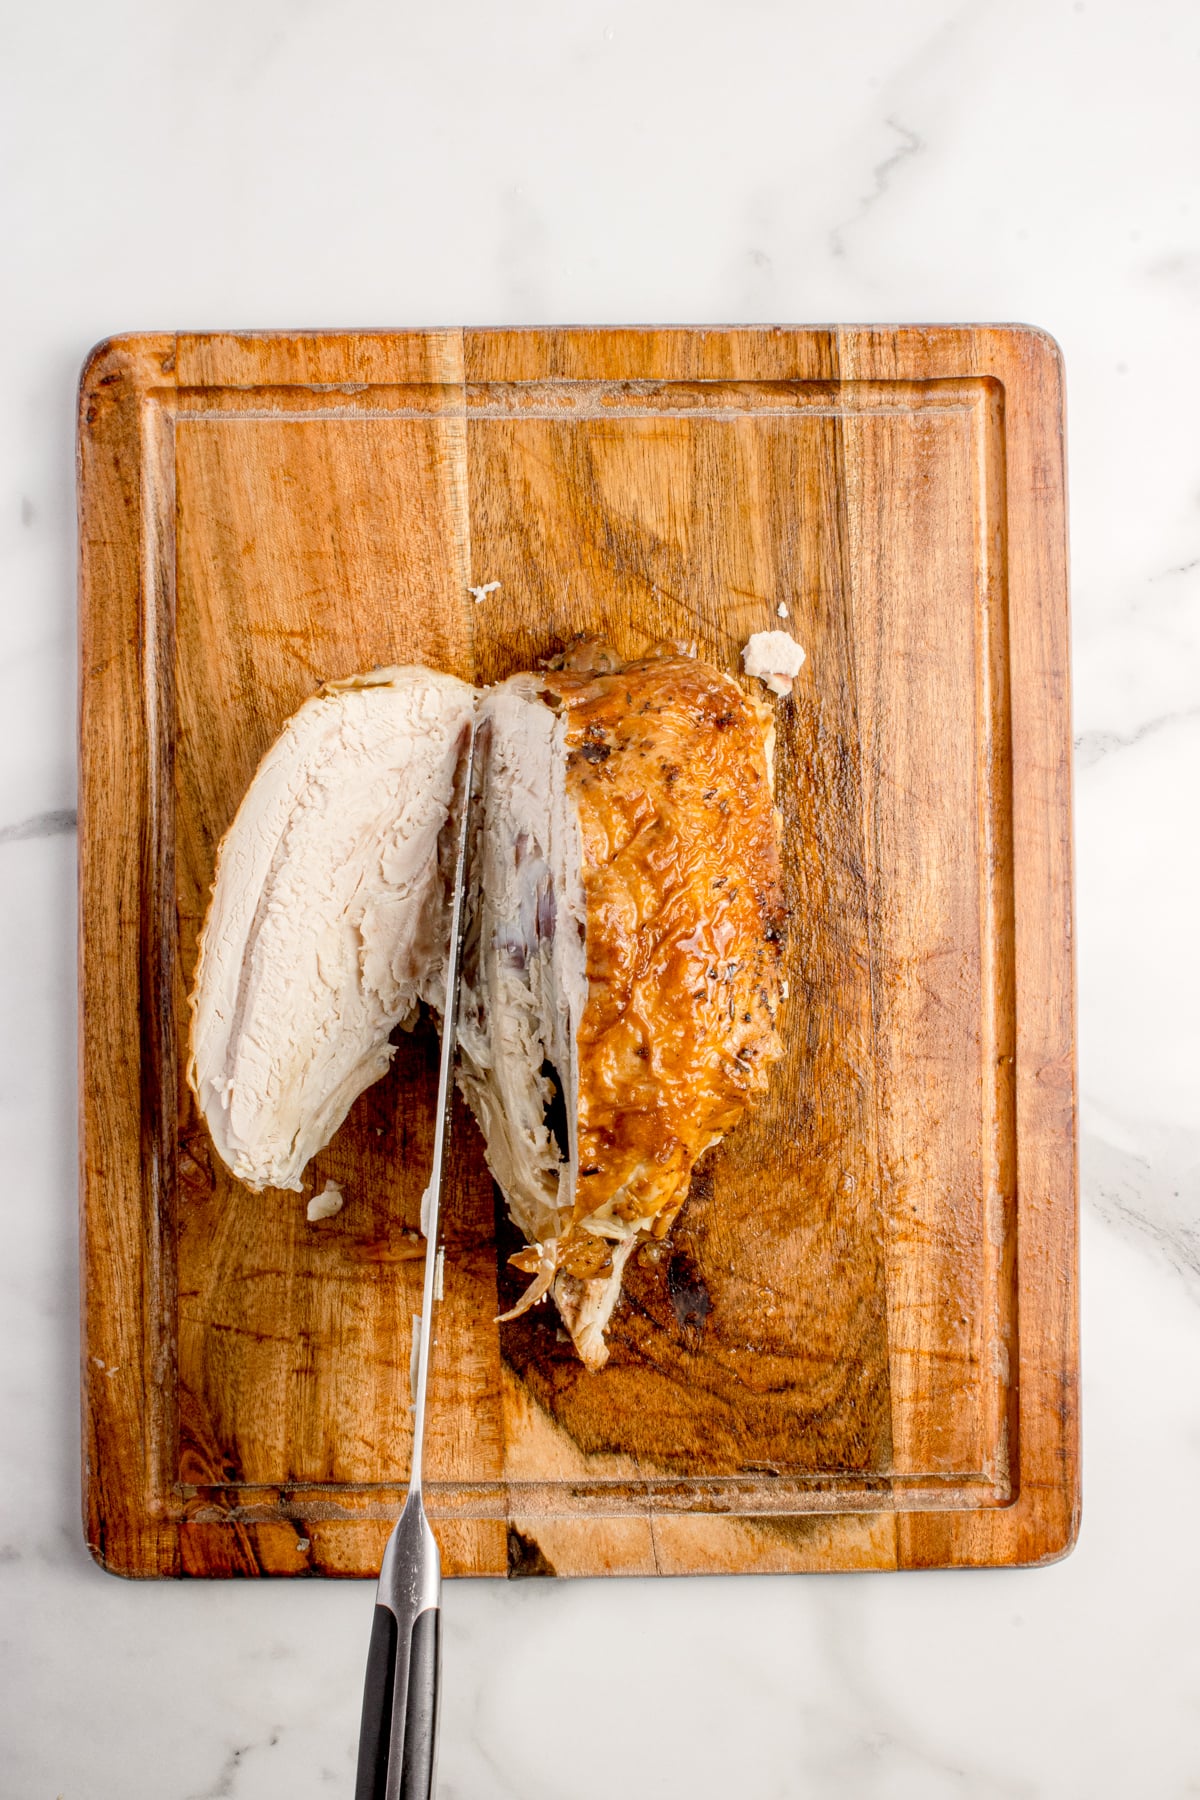
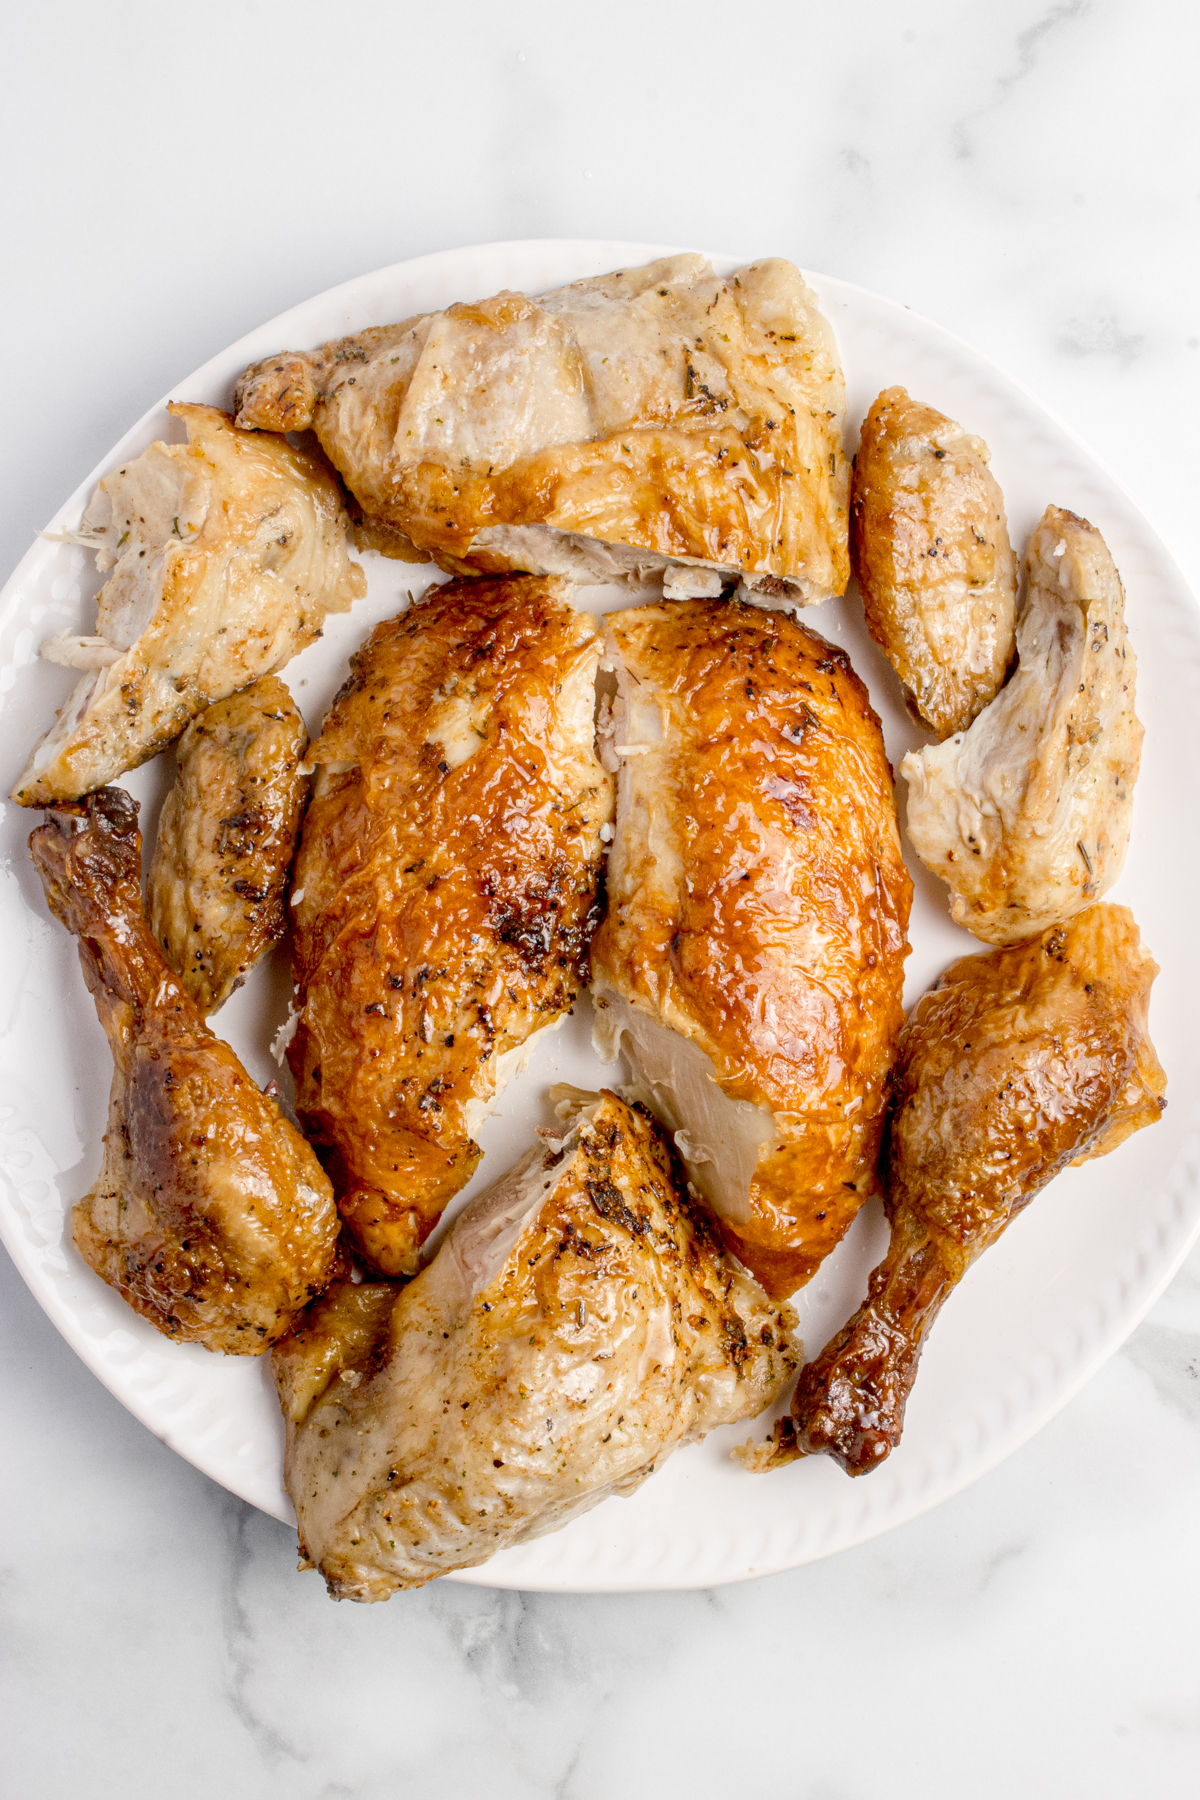
Step 4: Slice the Breasts
Slice down along the breastbone to remove each breast.
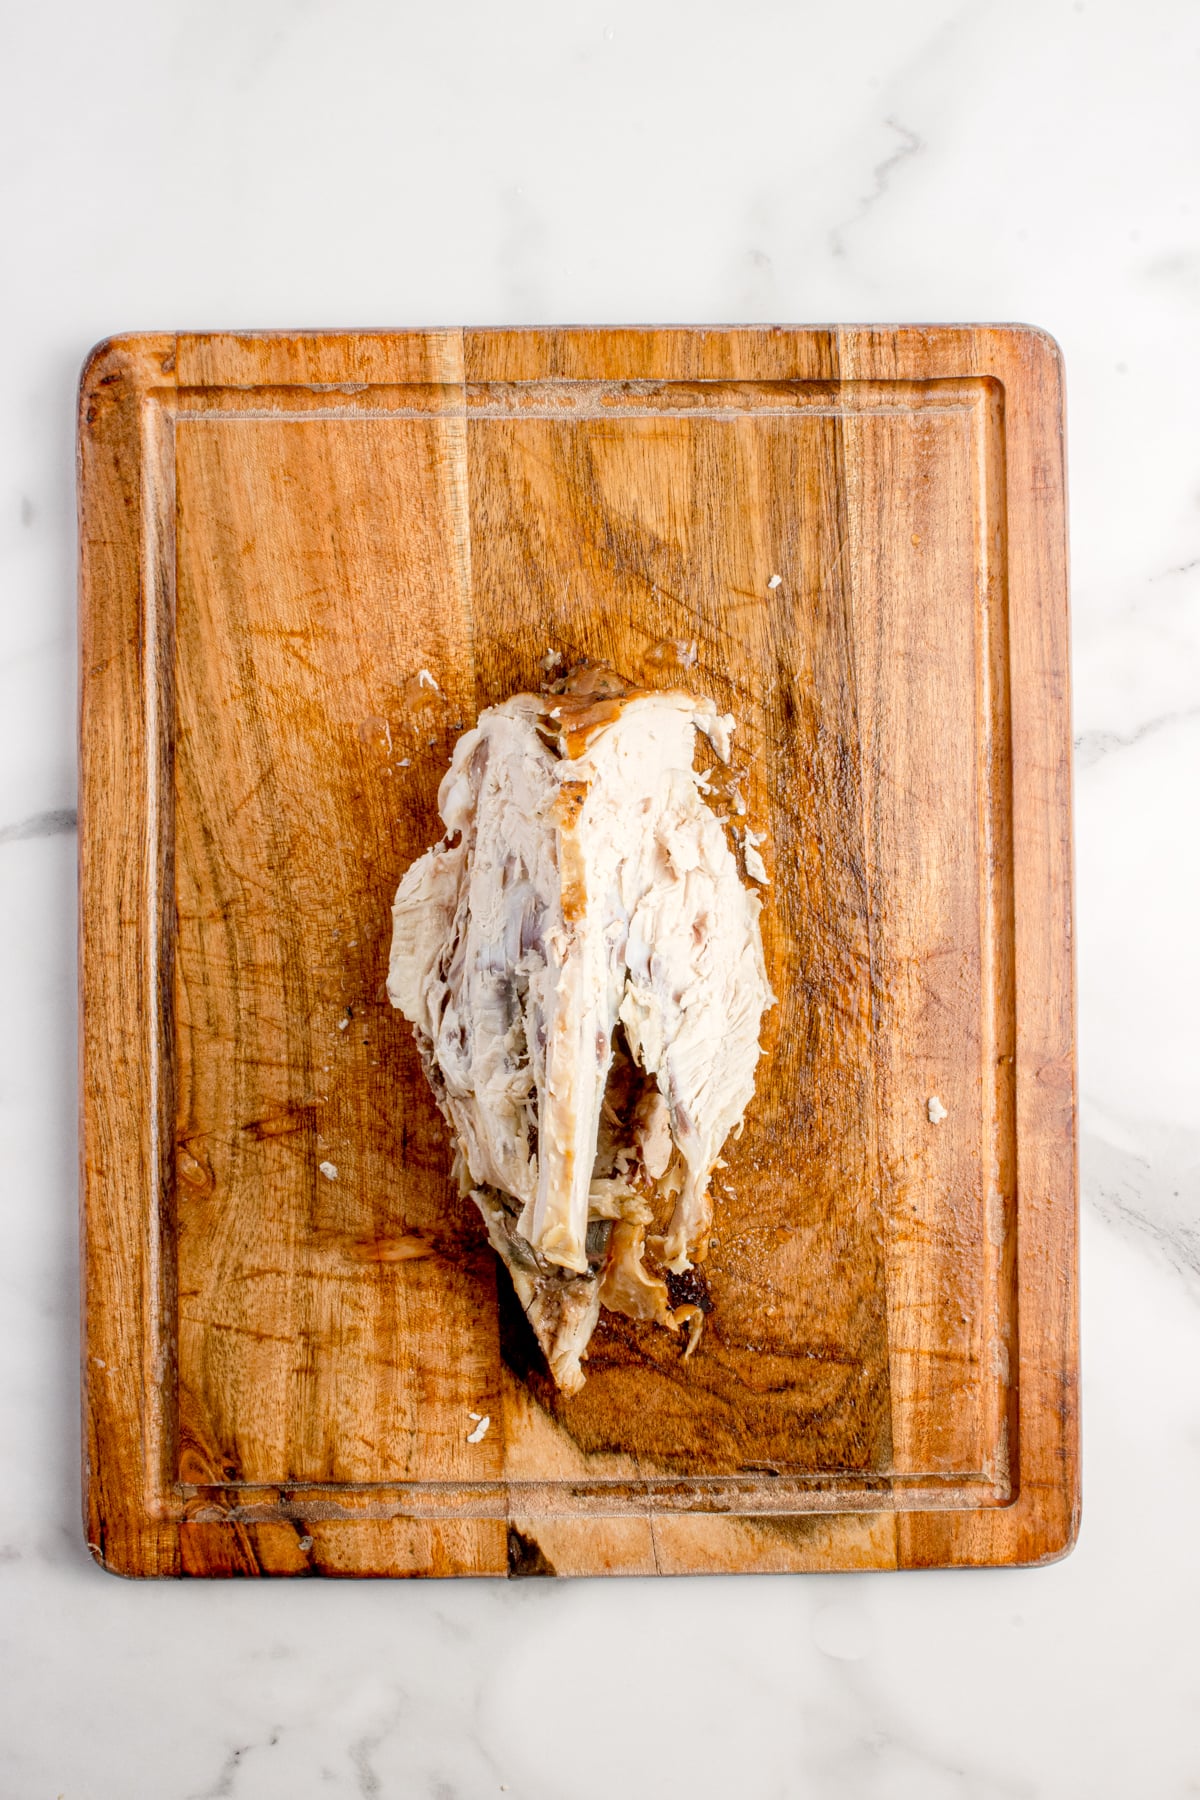
Step 5: Save the Carcass
Place the carcass and wing tips in a resealable or freezer bag for making stock. You should now have 2 chicken breasts, 2 thighs, 2 drumsticks, 2 drumettes and 4 flats.
How To Make Chicken Broth
To make broth with a rotisserie chicken carcass, cook it with any skin and juices from container or carving. Add in: 1 quartered onion, 2-3 chunked carrots, 2-3 celery stalks chunked with or without leaves, 3-4 garlic cloves smashed, a couple teaspoons of thyme or rosemary and a bay leaf. Do this in a large pot of 8-12 cups of water. Make sure there's enough water to cover carcass and vegetables.
Bring to a boil, then gently simmer on low for at least 2 hours, partially covered with a lid. If you want a richer flavor, extend the simmering for up to 4-6 hours. When it's done, strain the liquid, with a fine mesh strainer, into a bowl or pot, discarding solids. Do this once it reaches room temperature. Add salt to taste.
You also have the option to cook the broth on low in a slow cooker for 8-12 hours, or in an Instant Pot on high pressure for 40 minutes to 2 hours (with a natural release).
Once completely cool, transfer the broth to airtight containers and refrigerate for up to 7 days or if you want it frozen for up to 3 months. After the broth has been refrigerated, a layer of fat will solidify on top. This can be easily removed for a less greasy broth, or you can leave it for added richness.
Recipe Tips
- Don't worry about perfection: Your cuts don't have to look perfect. The goal here is to get comfortable. Every time you do this, it's going to get easier.
- Let the Chicken Rest: Wait 5 minutes before carving to retain juices whether it's pre-cooked or you made the chicken yourself to keep the meat moist.
- Sharp Knife: Use a sharp knife. Dull blades make carving harder and can cause the knife to slip. It can possibly cut you and it tears the meat.
- Don't force the knife: If you meet resistance, reposition slightly. Rotisserie chickens separate easily when you cut through joints instead of bone.
- Cut At Joints: Follow the joints, not straight through bones.
- Take Your Time: Work slowly and keep fingers tucked safely away.
- Stabilize Your Cutting Board: Placing damp paper towel under your cutting board keeps it in place and makes carving safer.
- Remove the Legs First: Always start with the legs and thighs. It makes the rest of the carving easier to do.
- Separate Thighs from Drumsticks: After removing the leg quarter, cut through the joint between the thigh and drumstick for portions.
- Remove the Wings Before the Breasts: Removing wings first gives you more room to remove the breast.
- Slice Along the Breastbone: Run your knife down one side of the breastbone and slowly follow the rib cage to remove the entire breast in one piece.
- Make Incredible Stock for Free: Keep every little scrap of chicken including what is left in the container you bought the chicken in for a flavorful stock or broth. You won't regret it.
- Don't Discard Anything: Once you strain your broth keep the vegetables. Dice them and add to your soup. They'll be so flavorful.
If you love recipes like this, you may also enjoy these easy pot pie muffins and this juicy and cheesy chicken melt.
Storage Directions
Proper storage keeps your carved rotisserie chicken fresh and safe.
Refrigerator: Store carved meat in an airtight container for up to 3 days, including the day you carved your chicken.
Freezer: Freeze portions in sealed freezer bags for up to 3 months.
Make Ahead: Carve the chicken immediately after bringing it home and portion for easy weeknight meals.
Reheat:
Oven: Reheat the chicken at 325°F in the oven with a splash of water or broth. Be sure to cover it to keep the meat juicy.
Air Fryer: You can also reheat it in the air fryer at 325°F for 5 mins or until it is warmed through.
Microwave: Warm gently in the microwave in 30 second bursts with a damp paper towel over the top checking to see if it is warmed through in between bursts.
Stovetop: Heat in a skillet with a splash of broth.
Serving Suggestions
- Shred for tacos, burritos, casseroles, buffalo chicken enchiladas. and quesadillas.
- Dice for chicken salad, soups or pasta dishes.
- Check out our list of favorite rotisserie chicken recipes for you to try.
Recipe FAQs
Use it to make homemade chicken broth. It is so flavorful and reduces waste.
No. You can store carcass and everything else in a freezer bag for up to 3 months until you're ready to make it.
Most standard chickens yield 3-4 cups of shredded or chopped meat.
Slightly warm chicken is easier because the joints separate more smoothly.
A gentle simmer prevents the stock from becoming cloudy and ensures a nice clear broth.
More Uses For Rotisserie Chicken
Do you like rotisserie chicken? Here some recipes you may also like to try.


If you try this recipe and love it please leave a star rating in the recipe card below or even better, drop a review in the comment section. I always appreciate your feedback. Be sure to follow along with me on Facebook, Pinterest, and YouTube for more easy recipes!

How to Carve a Rotisserie Chicken
Equipment
- Large cutting board
- Sharp chef's knife or boning knife
Ingredients
Rotisserie chicken
- 2 breasts
- 2 thighs
- 2 drumsticks
- 2 drumettes 4 flats
Instructions
- Breaking down a whole chicken can feel intimidating at first, but it's one of those skills that saves you money, and sets you up for the best homemade stock later.
- Set a damp paper towel under your cutting board to keep it from sliding. This matters more than people think.
- Pull the drumstick away from the body and slice through the joint that's between the thigh and the body. Repeat this on the other side. If it doesn't go easily, adjust slightly and try again.
- Slice through the skin between the thigh and the drumstick. Repeat this on the other side. If it doesn't go easily, adjust slightly and try again.
- Pull the wing away from the body and slice through the joint. Cut off the wing tip and save it for stock and then separate the drumette from the flat. Repeat this on the other side.
- Slice down along the breastbone to remove each breast.
- Place the carcass and wing tips in a resealable or freezer bag for making stock. Recipr below if you're interested. You should now have 2 chicken breasts, 2 thighs, 2 drumsticks, 2 drumettes and 4 flats.
Notes
- Don't worry about perfection: Your cuts don't have to look perfect. The goal here is to get comfortable. Every time you do this, it's going to get easier.
- Let the Chicken Rest: Wait 5 minutes before carving to retain juices whether it's pre-cooked or you made the chicken yourself to keep the meat moist.
- Sharp Knife: Use a sharp knife. Dull blades make carving harder and can cause the knife to slip. It can possibly cut you and it tears the meat.
- Cut At Joints: Follow the joints, not straight through bones.
- Take Your Time: Work slowly and keep fingers tucked safely away.
- Stabilize Your Cutting Board: Placing damp paper towel under your cutting board keeps it in place and makes carving safer.
- Remove the Legs First: Always start with the legs and thighs. It makes the rest of the carving easier to do.
- Don't force the knife: If you meet resistance, reposition slightly. Rotisserie chickens separate easily when you cut through joints instead of bone.
- Separate Thighs from Drumsticks: After removing the leg quarter, cut through the joint between the thigh and drumstick for portions.
- Remove the Wings Before the Breasts: Removing wings first gives you more room to remove the breast.
- Slice Along the Breastbone: Run your knife down one side of the breastbone and slowly follow the rib cage to remove the entire breast in one piece.
- Make Incredible Stock for Free: Keep every little scrap of chicken including what is left in the container you bought the chicken in for a flavorful stock or broth. You won't regret it.
- Don't Discard Everything: Once you strain your broth keep the vegetables. Dice them and add to your soup. They'll be so flavorful.
- To make broth with a rotisserie chicken carcass, cook it with any skin and juices from container or carving. Add in: 1 quartered onion, 2-3 chunked carrots, 2-3 celery stalks chunked with or without leaves, 3-4 garlic cloves smashed, a couple teaspoons of thyme or rosemary and a bay leaf. Do this in a large pot of 8-12 cups of water. Make sure there's enough water to cover carcass and vegetables.
- Bring to a boil, then gently simmer on low for at least 2 hours, partially covered with a lid. If you want a richer flavor, extend the simmering for up to 4-6 hours. When it's done, strain the liquid, with a fine mesh strainer, into a bowl or pot, discarding solids. Do this once it reaches room temperature. Add salt to taste.
- You also have the option to cook the broth on low in a slow cooker for 8-12 hours, or in an Instant Pot on high pressure for 40 minutes to 2 hours (with a natural release).
- Once completely cool, transfer the broth to airtight containers and refrigerate for up to 7 days or if you want it frozen for up to 3 months. After the broth has been refrigerated, a layer of fat will solidify on top. This can be easily removed for a less greasy broth, or you can leave it for added richness.


Leave a Reply