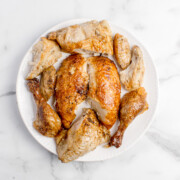
How to Carve a Rotisserie Chicken
How to carve a rotisserie chicken like a pro. Follow these easy steps to separate legs, breasts, wings, and save the carcass for broth perfectly every time.
Ingredients
Rotisserie chicken
- 2 breasts
- 2 thighs
- 2 drumsticks
- 2 drumettes 4 flats
Instructions
- Breaking down a whole chicken can feel intimidating at first, but it's one of those skills that saves you money, and sets you up for the best homemade stock later.
- Set a damp paper towel under your cutting board to keep it from sliding. This matters more than people think.
- Pull the drumstick away from the body and slice through the joint that's between the thigh and the body. Repeat this on the other side. If it doesn't go easily, adjust slightly and try again.
- Slice through the skin between the thigh and the drumstick. Repeat this on the other side. If it doesn't go easily, adjust slightly and try again.
- Pull the wing away from the body and slice through the joint. Cut off the wing tip and save it for stock and then separate the drumette from the flat. Repeat this on the other side.
- Slice down along the breastbone to remove each breast.
- Place the carcass and wing tips in a resealable or freezer bag for making stock. Recipr below if you're interested. You should now have 2 chicken breasts, 2 thighs, 2 drumsticks, 2 drumettes and 4 flats.
Notes
- Don't worry about perfection: Your cuts don't have to look perfect. The goal here is to get comfortable. Every time you do this, it's going to get easier.
- Let the Chicken Rest: Wait 5 minutes before carving to retain juices whether it's pre-cooked or you made the chicken yourself to keep the meat moist.
- Sharp Knife: Use a sharp knife. Dull blades make carving harder and can cause the knife to slip. It can possibly cut you and it tears the meat.
- Cut At Joints: Follow the joints, not straight through bones.
- Take Your Time: Work slowly and keep fingers tucked safely away.
- Stabilize Your Cutting Board: Placing damp paper towel under your cutting board keeps it in place and makes carving safer.
- Remove the Legs First: Always start with the legs and thighs. It makes the rest of the carving easier to do.
- Don’t force the knife: If you meet resistance, reposition slightly. Rotisserie chickens separate easily when you cut through joints instead of bone.
- Separate Thighs from Drumsticks: After removing the leg quarter, cut through the joint between the thigh and drumstick for portions.
- Remove the Wings Before the Breasts: Removing wings first gives you more room to remove the breast.
- Slice Along the Breastbone: Run your knife down one side of the breastbone and slowly follow the rib cage to remove the entire breast in one piece.
- Make Incredible Stock for Free: Keep every little scrap of chicken including what is left in the container you bought the chicken in for a flavorful stock or broth. You won't regret it.
- Don't Discard Everything: Once you strain your broth keep the vegetables. Dice them and add to your soup. They'll be so flavorful.
- To make broth with a rotisserie chicken carcass, cook it with any skin and juices from container or carving. Add in: 1 quartered onion, 2-3 chunked carrots, 2-3 celery stalks chunked with or without leaves, 3-4 garlic cloves smashed, a couple teaspoons of thyme or rosemary and a bay leaf. Do this in a large pot of 8-12 cups of water. Make sure there's enough water to cover carcass and vegetables.
- Bring to a boil, then gently simmer on low for at least 2 hours, partially covered with a lid. If you want a richer flavor, extend the simmering for up to 4-6 hours. When it's done, strain the liquid, with a fine mesh strainer, into a bowl or pot, discarding solids. Do this once it reaches room temperature. Add salt to taste.
- You also have the option to cook the broth on low in a slow cooker for 8-12 hours, or in an Instant Pot on high pressure for 40 minutes to 2 hours (with a natural release).
- Once completely cool, transfer the broth to airtight containers and refrigerate for up to 7 days or if you want it frozen for up to 3 months. After the broth has been refrigerated, a layer of fat will solidify on top. This can be easily removed for a less greasy broth, or you can leave it for added richness.